source:http://forum.xda-developers.com/showthread.php?t=1044765 NOTICE:
Gingerbreak is an exploit that has been fixed in many of the latest
Android versions and releases. If it does not work, it does not work. I
can't "fix" the exploit, you will have to wait for a new exploit to come
out, or root a different way!
About
The GingerBreak APK is a wrapper around the newly released GingerBreak
exploit (credits to The Android Exploid Crew), which is meant to attain
root access on GingerBread. This specific exploit may work on various Froyo and Honeycomb versions as well.
What the APK and exploit do is as follows:
- The APK puts the right files in the right place to run the exploit
- The APK runs the exploit
- The exploit attempts to attain root access
- If it succeeds, the exploit remounts /system as read-write and runs the installer script
- The installer script attempts to install the su binary and superuser APK, and reboots
Some important things to know:
- You must have USB debugging enabled on your device
- You need to have an SD card (formatted and) inserted - if it doesn't
work, try formatting the SD card in your computer, or switching it with a
different (or old, etc) SD card
- The APK must be installed to device, NOT SD card
- The exploit may take a while to run, but not more than 10 minutes, if
it does, get me a logcat, and reboot the device. In rare occasions, even
if the device does not reboot, you may still have root. So check that
out after you manually pull battery after 15 minutes or so of being
stuck.
- Always reboot between root attempts!
- While (temporary?) root access may be attained, due to locked
bootloaders, efuses, S-ON, and whatnot this may still not work on your
device. For temproot purposes, use the raw binary exploit (linked
below), not this APK.
- The GingerBreak exploit should not be used to attain temproot and
continue using the device. It fscks vold, you do not want to be running
like that. You want to reboot! So if the root doesn't stick, you (still)
have a problem.
Installation
- Optional: Press the Thanks button below this post
- Make sure USB debugging is enabled
- Make sure you have an SD card (formatted and) inserted
- Get the APK on the phone somehow, and install it
- Open the APK, press the root button
- Wait a few minutes. If there are no problems, the device will reboot
(note that the reboot itself can take like 10 minutes due to cache wipe)
- Make sure the Superuser app is install and working
- Optional: Install BusyBox from Market (I personally prefer the stericsson installer)
- Optional: Uninstall GingerBreak, you don't need it on your phone anymore
- Optional: Make a donation
WARNING: Apparently on some devices the root
exploit causes the SD card (internal or external) to be formatted. Also,
if it gets stuck but you do see the card mounting/unmounting, try
formatting your SD card yourself and try again (or use a different SD
card) - often this works (a fix for both issues is being looked at)
NO IT DOES NOT WORK ON THE GALAXY ACE (yet ?)
WORKS ON A RARE SGS2, BUT NOT ON MOST (seems to be only pre-release devices that are rootable this way)
ACER A500 / ICONIA Look here (click). Will eventually be integrated, I guess
Report!
Please report back if it does or doesn't work on specific devices. If it
doesn't, don't forget to post your logcat as attachment, and mention
your device details and GingerBreak version.
Credits
- I made the APK and did some slight modding to the exploit code to install from an APK
- The exploit ("GingerBreak") itself is made by The Android Exploid Crew. Original code can be found here: http://c-skills.blogspot.com/2011/04...ngerbreak.html
Manual rooting
From v1.1 it is no longer possible to manually root the device over an
ADB connection using the files from this APK. Please use the original
binaries from the c-skills website to do this. There are several guides
posted here on XDA about how to do this manually, some are
mentioned/linked-to in the first few pages of this thread.
Note
GingerBreak is not specific to any device, but there is code in there
that may not work on device X or Y. The exploit is generic, but that
does not mean one size fits all, nor does it mean that there will be no
firmwares out there that fix this exploit. A special version may need to
be compiled for your device, ask your favorite hacker from your
specific device's forum. This APK is meant to make the process easier,
but also adds dependancies so that it may not work on your device.
AGAIN, THIS DOES NOT WORK ON S-ON DEVICES !
Changelog
26.04.2011: v1.2
- Removed some code that may break operation while the code itself isn't needed
- Added UnRoot option
- The APK now logs exploit output semi-live
22.04.2011: v1.1
- Modded exploit code to not need /data/local/tmp - this should fix the
problem extracting assets as well as be more compatible with various
devices (in theory). In case the APK notices that this cannot work, it
will warn you about this.
- Added some warnings and errors to the APK
21.04.2011: v1.0
- First release of APK
- Slight mods to the exploit source to have it work better from APK
You can now
root and unroot your phone easily. Brought to you by Doomlord (an XDA
developer). If you’re still wondering what rooting an Android phone
means and why you should do it, I suggest you go through the post I previously wrote. I aso you make a backup of your data before rooting your Android device by following this guide.
Note: Actually this method of rooting is firstly created for Sony
Ericson devices but when this method is applies to other phones as well,
it works same as for Sony Ericson devices.
KINDLY NOTE: LATEST .62 FW CANNOT BE ROOTED
Easy Rooting Toolkit is for WINDOWS ONLY & WILL WORK ON BOTH LOCKED & UNLOCKED BOOTLOADER DEVICES!
Easy Rooting Toolkit will work on the following devices:-
* Sony Xperia X10 (GB firmware)
* Sony Xperia Arc (.42 firmware)
* Sony Xperia Arc S
* Sony Xperia Play [R800i/R800x]
* Sony Xperia Ray
* Sony Xperia Neo
* Sony Xperia Mini
* Sony Xperia Mini Pro
* Sony Xperia Pro
* Sony Xperia Active
* NTT Docomo Xperia ARCO SO-02C
* Samsung Galaxy S2 [GT-i9100/GT-9100P]
* Samsung Galaxy S II for T-Mobile (SGH-T989)
* Samsung Galaxy S II for AT&T (SGH-I777), Skyrocket (SGH-i727)
* Samsung Galaxy S II LTE Rogers Canada (SGH-I727R), Android version 2.3.5, Baseband version I727RUXKJ7
* Samsung Galaxy S II Epic 4g Touch
* Samsung Galaxy S2 HD LTE (SHV-E120S)(korea)
* Samsung Galaxy i9100G
* Samsung Galaxy S [i9000B] & [i9000 2.3.3 (PDA I9000BOJV8, Phone
I9000XXJVO, CSC I9000GDTMJV7) and german T-Mobile branding]
* Samsung Galaxy S Plus (GT-I9001) OS 2.3.3 and 2.3.6 (I9001ZSKP6)
* Samsung Galaxy Mini GT-S5570 (GB only)
* Samsung Galaxy Mini Pro i5510
* Samsung Galaxy W [i8150]
* Samsung Galaxy Y
* Samsung Galaxy Tab [P1000] (2.3.3 firmware), [P1000N]
* Samsung Galaxy Note [N7000]
* Samsung Galaxy Player YP-G70 2.3.5 (GINGERBREAD.XXKPF)
* Samsung Galaxy Ace (2.3.3, 2.3.4 firmware)
* Samsung Nexus S [i9023] (2.3.6)
* Samsung Nexus S 4G 2.3.7
* Samsung Galaxy Nexus S [i9020] (2.3.6)
* Samsung Exhibit (SGH-T759)
* Samsung Exhibit 4G (SGH-T759) (2.3.3) Build UVKE8
* Samsung Captivate i897 UCKH3
* Motorola Milestone 3 [ME863 HK]
* Motorola XT860, Bell XT860
* Motorola Defy+
* Motorola Droid X sys ver 4.5.605 w/ gingerbread
* Motorola Droid X2 (2.3.4) Sys ver 1.3.380.MB870.Verizon.en.US Build 4.5.1A-DTN-150-30
* Motorola XT883 (China Telecom)
* Motorola XT862 (Verizon Droid3)
* Motorola DROID RAZR
* Nexus One (2.3.6 stock)
* LG Revolution
* Vizio VTAB1008 Tablet
* Huawei IDEOS U8150 (2.2) Steps:-
- Download Easy ROOTING Toolkit
- Before rooting your android phone make sure you have:-
* installed ADB (Android Debug Bridge) drivers for your phone, you can download drivers for Xperia phones from here: USB ADB Driver for Win7/Vista x64 & x86 Eng/Multi USB ADB Driver for Windows XP – 32bit Eng/Multi Instructions:
1. Download, unzip and install the included .exe files.(Windows
7/vista users right click on extracted .exe file and select ‘Run as
administrator.’)
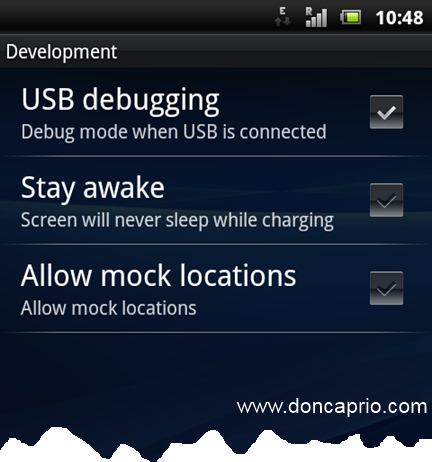
2. Enable USB Debugging on your Mobile under Settings > Applications > Development > USB debugging
3. Plug in your Phone and windows will start to install your device. During installation this message may come up: Be sure and select “install this driver software anyway”
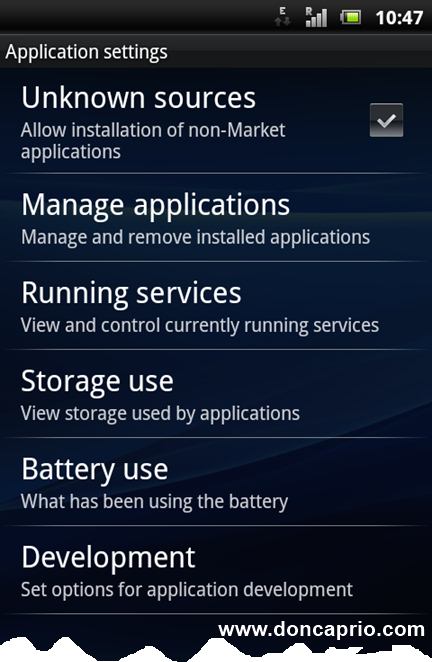
* Now go to Menu > Settings > Applications and “enable unknown sources”
* Also enable “USB DEBUGGING” by going to Menu > Settings > Applications > Development
* Increase screen timeout to 10 minutes [OPTIONAL]
* Connect your phone to pc using usb cable
* Skip “PC Companion Software” prompt on device
- Rooting your android phone with easy rooting toolkit
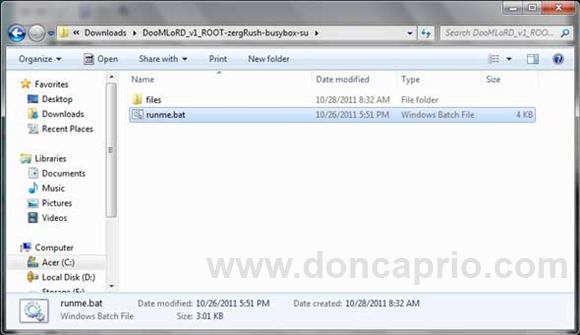
1. First Extract rooting kit to any safe place like desktop
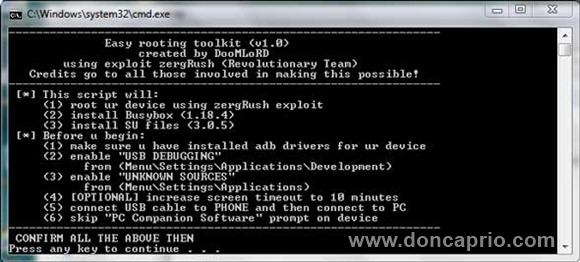
2. Double click on “runme.bat” 3. It will run rooting script and you will see a command prompt like below
4. Once your phone successfully connected to pc , hit any key to start rooting. Note:- It will complete in few seconds . During this process don’t close command prompt or don’t disconnect your phone
5. On completion your phone will reboot , and “ALL DONE!!” message
will appear in command prompt that means your phone rooted successfully
6. Now you can press any key to close it
Congratulations you have successfully root your android phone , now
you can enjoy your phone’s full potential. enjoy all rooting
benefits…..:) You can also UNROOT your Android Mobile it too:::::::::::::::::::::-
- Download easy unroot toolkit by Doomlord
Procedure to Unroot your phone:
i. Unzip the above downloaded file named “UNROOTING SCRIPT v1.0”.
ii. Now open the extracted folder and launch the file named “RUNME-UNROOT.bat”.
iii. Now follow the on screen instructions. WARNING: Performing the unroot procedure again and again is on your own risk.
Enjoy!!! And have fun with the new easiest and common method to root/unroot any Android devices….
[ROOT] Xperia P {6.0.B.1.654}
Here is a system.img prerooted for Xperia P firmware 6.0.B.1.654.
HowTo:
1.) Unlock your bootloader via SonyMobile Website
2.) Download prerooted system: https://rapidshare.com/files/1566642..._nypon_654.img (i needed to move from university server to rapidshare because of too much traffic, sorry!)
3.) Flash prerooted system with fastboot:
Code:
fastboot flash system system_prerooted_nypon_654.img
4.) reboot & done
Unlock the boot loader
Instructions
Known issues
Some customers with unlocked boot loaders have
experienced problems when they are accepting over the air upgrades (FOTA
- Firmware upgrade Over The Air). For customers that have unlocked the
boot loader, please do not accept any over the air upgrades. For
additional information, check out the hints and tips from the community
on the XDA forum.
Instructions
First, you should confirm that it is possible to unlock the boot
loader of your phone by checking the service menu. In your phone, open
the dialler and enter *#*#7378423#*#* to access the service menu.
In your phone, tap Service info > Configuration > Rooting Status. If Bootloader unlock allowed says Yes, then you can continue with the next step. If it says No, or if the status is missing, your device cannot be unlocked.
On your computer, click Continue at the bottom of this page to start the unlock boot loader process.
Read through the information in the pop up window and click Yes, I’m sure, if you are still confident you want to unlock the boot loader.
Read through and accept the legal terms. Click I Accept.
Enter your name, email address and the first 14 digits (remove the last digit) of your phone’s IMEI number. Click Submit. You can view the IMEI number by entering *#06# on your phone.
The unlock boot loader key is displayed. Write it down and save it for later use.
Download and unzip this file.
This is the standard android_winusb.inf-file, with a few lines of code
added to enable Fastboot to support Sony and Sony Ericsson devices. Make
sure you are running Google USB Driver package revision 4 or higher in
your Android SDK. You can see current Google USB Driver package revision
in the SDK Manager.
Place the unzipped file in the usb_driver folder, located in the Android SDK > extras > google
folder on your computer. Accept to replace the old
android_winusb.inf-file with the new file. If you can't find the
usb_driver folder, please install the Google USB Driver Packager using
the Android SDK manager.
Turn off your phone.
On your phone, push and hold the unlock button* at the same time
as you connect the phone to the computer with a USB-cable. The unlock
button may differ between different phone models. See the note in the
bottom of this page for more information on what button use on your
phone.
On your computer, you will be asked for drivers. Point to the
usb_driver folder where you placed the android_winusb.inf-file, and
select the Android Boot loader Interface-file.
Open a command window and go to the tools folder within the Android SDK folder.
Enter fastboot.exe -i 0x0fce getvar version, and verify that you get a response back (for example "0.3"). This means your phone is connected properly.
Warning!
If you perform this step, you will unlock the boot loader. This may
void your warranty and/or any warranty from your operator. If you still
want to unlock the boot loader of your phone, enter fastboot.exe -i 0x0fce oem unlock 0xKEY,
where KEY is the unlock boot loader key you got in the beginning of
this instruction. The boot loader should now be successfully unlocked.
Updates, Contents, Disclaimer , Requirements, Recommended, Instructions (for both bootloader unlock and custom kernel flashing and relocking the bootloader), How to find out if the bootloader on your phone has been successfully unlocked , Benefits of Custom Kernel, Common problems, Myths concerned with unlocking bootloader.
0. You can unlock your bootloader on a SIM-locked phone
1. Real dual touch for synaptic devices. 2. Higher max CPU overclock frequency. 3. Sim-unlock your phone (allow it to use any carrier) __________________________________________________ __________________
Updates to this:
1. GUIDE UPDATE (finally lolz -- added new download links and made some edits)
Still using the old tools method -- more complicated to use but flexible (doesn't obligate stock to unlock, but please keep to GB and below)
My guide is not the simplest to understand, nor is it the most up-to-date, but if done and read correctly it gives you the most information about BL and kernels and also is quite safe.
Hold your horses! Check if your phone will be hard bricked by the bootloader unlock process!
If your phone's manufacture date is 11W29 or PAST 11W29, DO NOT ATTEMPT TO UNLOCK YOUR BOOTLOADER. IT WILL MOST LIKELY RESULT IN A HARD BRICK (though some users managed to successfully unlock).
Before I start I must emphasise the fact that meddling with the bootloader is highly dangerous and will result in a hard brick if you don't follow proper instructions. Then, you will have to go and repair your phone by sending it to SE . I am not responsible if your phone dies on you because you didn't follow instructions or you screwed up somehow. I must also mention that this will probably void your warranty (rooting already probably voided it though) and that there is NO WAY to relock bootloader as of now.
Still interested? Details are below.
Requirements: Rooted phone, Sony Ericsson PC Companion installed in PC, Courage
You do not need to have a sim lock on your phone to unlock your bootloader.
Recommended: Disable your antivirus (it might find a "virus" in ADB.exe even though there isn't one and might even interfere in bootloader unlocking process) Use stock rom (I managed to unlock bootloader on GingerDX v013 though and users have managed to unlock it in Froyobread v23b and MiniCM7 2.0.7 | Don't try on ICS roms)
Note: Unlocking the bootloader of your phone will restore the original sim lock of your phone (if you had any) unless if you unlocked with EMMA/IMEI unlock code or it was factory-unlocked or if SE unlocked it!
However, some users have reported that using msm7227_semc.cmd on their sim-unlocked phones did not restore the sim lock onto their phone. This has not been confirmed as of yet. Unlock the bootloader on your sim unlocked phone AT YOUR OWN RISK! ______________________________________
1. Download the files needed for the unlock. (Credits go to the_laser for this tool.)
Download and extract the archive. Contains X8, W8, X10 mini and X10 mini pro stock kernels, the unlock tool and also the updated S1tool that can relock your bootloader!
1a. Download Flashtool too (needed for S1tool to work properly and for loading custom kernels next time) and install it (not necessary if you already have Flashtool):
Download and install Flashtool (follow instructions on the website): http://androxyde.github.com/Flashtool/ (Credits go to Androxyde and Bin4ry for this tool.)
After installing it, open the flashtool folder and open the drivers folder inside that. Double click on the .exe file inside and install your device's ADB driver (for W8 use the X8 ones) and the Flash mode drivers.
Then restart your computer.
Open task manager and kill any ADB.exe process you find in there and don't load Flashtool for the rest of the installation process. __________________________________________________ _____________
Also, download and install PC Companion (not needed if you already have PC Companion on your computer) here (needed for the bootloader unlocking process).
Then just double click the .exe file and install PC Companion. Connect your phone to the PC after doing this and open Sony Ericsson PC Companion. Ensure that your phone is recognised by PC Companion.
Note: If your antivirus finds virus in ADB.exe, disable the antivirus. There is NO virus in ADB.exe and the antivirus will interfere in unlocking bootloader.
2a. Turn off your phone.
2b. Open the directory you unzipped S1tool to and run S1tool.exe. Then, click on IDENTIFY button before proceeding to step 2c.
2c. Boot your phone into flash mode (make sure you installed your device's drivers found in step 1a first). All users, press and hold back button while connecting cable from PC to phone. Continue holding back button until you get some output. The LED on your phone should flash green if it is in flash mode.
Example of output:
Code:
9/9/2011 21:41:44 Welcome to S1 identify tool
9/9/2011 21:45:13
9/9/2011 21:45:13 TO CONNECT NEXT PHONES
9/9/2011 21:45:13 X10 Xperia,E10 Xperia Mini,E15 Xperia X8,U20 Xperia Mini Pro
9/9/2011 21:45:13 LT15 Xperia ARC,MT15 Xperia NEO,R800 Xperia PLAY
9/9/2011 21:45:13 PRESS AND HOLD "BACK" BUTTON...
9/9/2011 21:45:13
9/9/2011 21:45:13 PLEASE ATTACH TURNED OFF PHONE NOW
9/9/2011 21:45:13
9/9/2011 21:45:46
9/9/2011 21:45:46 RUNNING S1_EROM VER "r8A029"
9/9/2011 21:45:46 SOFTWARE AID: 0001
9/9/2011 21:45:46 LOADER AID: 0001
9/9/2011 21:45:49 FLASH ID: "002C/00BC"
9/9/2011 21:45:49 LOADER VERSION: "R4A045"
9/9/2011 21:45:49
9/9/2011 21:45:49 MODEL (from GDFS): X8
9/9/2011 21:45:49 SOFTWARE VERSION: 1236-9291_2.1.1.A.0.6
9/9/2011 21:45:49 CUSTOM VERSION: 1241-3178_R1B
9/9/2011 21:45:49 FILESYSTEM VERSION: WORLD-1-8_2.1.1.A.0.6
9/9/2011 21:45:49 SERIAL NO: CB511SPH7Q
9/9/2011 21:45:49
9/9/2011 21:45:49 SEMC SIMLOCK CERTIFICATE
9/9/2011 21:45:49 Elapsed:36 secs.
If the simlock certificate specified is SEMC SIMLOCK CERTIFICATE, or anything other than NOT RECOGNIZED SIMLOCK CERTIFICATE, jump to step 3. If the simlock certificate specified is NOT RECOGNIZED SIMLOCK CERTIFICATE, you can't unlock the bootloader of your phone. If you try, radio capability of your phone will be disabled (this has been reported to be untrue by a number of people who claim to have unlocked bootloader successfully with msm7227_semc.cmd). Do note that the SIMLOCK certificate doesn't mean that you have/don't have a sim lock on your phone.
3. Disconnect your phone from the computer, boot it up, and then reconnect your phone to your computer.
4. Enable USB debugging on your phone.
Note: Don't run Flashtool and terminate any ADB.exe process you find in task manager before performing step 5.
5. If you had 1: the SEMC SIMLOCK CERTFICATE message or if you 2: unlocked your phone using EMMA/IMEI code 3: or if your phone was already unlocked when you bought it (first-hand phone) 4: or if your phone is sim-locked __________________________________________________ _________________________
THEN run msm7227_semc.cmd in the directory you unzipped the unlocking files to and press any key to start the unlocking process. Alternatively, you could use Flashtool to bootloader-unlock your phone (if you want to use Flashtool, go to step 5c). Go to step 5b.
If you 1. had the SETool unlock certificate
THEN go to step 5a.[/U]
5a. Run msm7227_Setool2.cmd in the directory you extracted the bootloader unlock tool to and press any key to start the process. Alternatively, you could use Flashtool to bootloader-unlock your phone (if you want to use Flashtool, go to step 5c)
5b. Open the example log included in the files. Wait 5 minutes. Then, compare the text in the window to those in the example log. They should be similar. Also, the last message on the window should be Press any key to continue. Note: It is recommended to turn off your antivirus before starting this as antivirus might interfere with the unlocking of bootloader on your phone (some antivirus software claim that there is virus in ADB.exe even though there isn't one)
Text in example log:
Code:
process requires standard 2.x android firmware.
Press any key to continue . . .
Getting ROOT rights.
1743 KB/s (585731 bytes in 0.328s)
error: protocol fault (no status)
Waiting ...
Removing NAND MPU restrictions via SEMC backdoor. Permanent. Require ROOT rights.
192 KB/s (3087 bytes in 0.015s)
success
Waiting ...
Getting ROOT rights.
Waiting ...
Writing patched semcboot. Two step process
First, we need get access to semcboot area
504 KB/s (8064 bytes in 0.015s)
Second, we need to write semcboot ;)
1130 KB/s (596916 bytes in 0.515s)
successfully wrote 0003ff00
Press any key to continue . . .
Note: If your log is very different from this please check if your bootloader is unlocked using step 7. If it is not unlocked, turn off your antivirus and repeat step 5 again. If you get some "error: protocol fault" messages, that is completely fine, this is because the "problem" is that your phone was still rebooting and USB debugging mode is not turned on when rebooting so it couldn't acquire the status and had an error. If you get many "Access is denied" messages, turn off your antivirus and try again. Some users reported that the "Access is denied" messages were eradicated and they successfully unlocked their bootloaders after turning off their antivirus.
5c.
Start Flashtool, connect your phone and then wait for your phone to be recognized.
Then, go to: Plugins/(insert device name here) Unlock/run
A screen will pop up and ask you to connect your phone in Flash mode
1. Unplug the USB cable from your phone. 2. Turn off your phone. 3. Press and hold the "Back" button on your phone. 4. Plug in the USB cable to your phone. 5. Release the "Back" button after the screen that popped up disappears.
The unlocking process will start.
Wait until Flashtool asks you to disconnect the cable off the phone, then turn on the device and connect the usb cable once again.
Wait for Flashtool to push the required files to your phone.
After a while, Flashtool will have 4he message "Successfully applied unlock" and the phone will reboot.
Also, download and install Flashtool here (follow instructions on the website): http://androxyde.github.com/Flashtool/ e0D (Credits go to Androxyde and Bin4ry for this tool.)
After installing it, open the flashtool folder and open the drivers folder inside that. Double click on the .exe file inside and install the ADB drivers for your phone AND the flash mode drivers (needed for S1tool to work).
After downloading s1tool and extracting it to an appropiate location on your PC (not needed you already have S1tool), shut down your phone.
Open s1tool.exe found in the directory you extracted s1tool to and then click IDENTIFY button.
Boot your phone into flash mode (Press and hold back button while connecting it to your PC using an usb cable. The LED on your phone should flash green). Continue holding back button until you get some output.
Example of output:
Code:
9/9/2011 21:41:44 Welcome to S1 identify tool
9/9/2011 21:45:13
9/9/2011 21:45:13 TO CONNECT NEXT PHONES
9/9/2011 21:45:13 X10 Xperia,E10 Xperia Mini,E15 Xperia X8,U20 Xperia Mini Pro
9/9/2011 21:45:13 LT15 Xperia ARC,MT15 Xperia NEO,R800 Xperia PLAY
9/9/2011 21:45:13 PRESS AND HOLD "BACK" BUTTON...
9/9/2011 21:45:13
9/9/2011 21:45:13 PLEASE ATTACH TURNED OFF PHONE NOW
9/9/2011 21:45:13
9/9/2011 21:45:46
9/9/2011 21:45:46 RUNNING S1_EROM VER "r8A029"
9/9/2011 21:45:46 SOFTWARE AID: 0001
9/9/2011 21:45:46 LOADER AID: 0001
9/9/2011 21:45:49 FLASH ID: "002C/00BC"
9/9/2011 21:45:49 LOADER VERSION: "R4A045"
9/9/2011 21:45:49
9/9/2011 21:45:49 MODEL (from GDFS): X8
9/9/2011 21:45:49 SOFTWARE VERSION: 1236-9291_2.1.1.A.0.6
9/9/2011 21:45:49 CUSTOM VERSION: 1241-3178_R1B
9/9/2011 21:45:49 FILESYSTEM VERSION: WORLD-1-8_2.1.1.A.0.6
9/9/2011 21:45:49 SERIAL NO: CB511SPH7Q
9/9/2011 21:45:49
9/9/2011 21:45:49 SEMC SIMLOCK CERTIFICATE
9/9/2011 21:45:49 Elapsed:36 secs.
If the line RUNNING S1_EROM FROM VER "#8A02$" has a lowercase "r" letter replacing the "#" (RUNNING S1_EROM FROM VER "r8A02$"), your bootloader has been unlocked . If it has an uppercase "R" replacing the "#" (RUNNING S1_EROM FROM VER "R8A02$"), your bootloader is NOT unlocked .
Note: The value of the "$" is dependent on an unknown factor. The unknown factor doesn't matter to us.
How do I know this? Here:
Quote:
Originally Posted by the_laser in the bootloader unlock thread
0. Flash back stock kernel using "Repair" option in SEUS or by using Flashtool (if using Flashtool either flash stock firmware or flash the appropiate .ftf file below):
All the stock kernels (for W8, X8, X10 mini and X10 mini pro):
If you relock your bootloader while using a custom kernel your phone will be bricked!
1. Download S1tool and extract it to an appropiate location on your PC (not needed if you already have s1tool) . (Credits go to the_laser for this tool)
(Credits go to Androxyde and Bin4ry for this tool.)
After installing it, open the flashtool folder and open the drivers folder inside that. Double click on the .exe file inside and install the ADB drivers for your phone and the Flash mode drivers (needed for Flashtool to work).
3. Turn off your phone.
4. Launch s1tool.exe in the folder you extracted s1tool to.
5. Click on Restore button and then connect your phone to the PC in flash mode (press and hold back button while connecting your phone to the PC).
6. Wait for the process to complete. Congratulations! You now have relocked your bootloader!
7. To check, open s1tool.exe, click IDENTIFY button, turn off your phone, connect it in flash mode to the PC (press and hold back button while connecting your phone to the PC. The LED on your phone should flash green).
8. Continue holding back button until there is some output.
Example of output:
Code:
9/9/2011 21:41:44 Welcome to S1 identify tool
9/9/2011 21:45:13
9/9/2011 21:45:13 TO CONNECT NEXT PHONES
9/9/2011 21:45:13 X10 Xperia,E10 Xperia Mini,E15 Xperia X8,U20 Xperia Mini Pro
9/9/2011 21:45:13 LT15 Xperia ARC,MT15 X0eria NEO,R800 Xperia PLAY
9/9/2011 21:45:13 PRESS AND HOLD "BACK" BUTTON...
9/9/2011 21:45:13
9/9/2011 21:45:13 PLEASE ATTACH TURNED OFF PHONE NOW
9/9/2011 21:45:13
9/9/2011 21:45:46
9/9/2011 21:45:46 RUNNING S1_EROM VER "r8A029"
9/9/2011 21:45:46 SOFTWARE AID: 0001
9/9/2011 21:45:46 LOADER AID: 0001
9/9/2011 21:45:49 FLASH ID: "002C/00BC"
9/9/2011 21:45:49 LOADER VERSION: "R4A045"
9/9/2011 21:45e3A49
9/9/2011 21:45:49 MODEL (from GDFS): X8
9/9/2011 21:45:49 SOFTWARE VERSION: 1236-9291_2.1.1.A.0.6
9/9/2011 21:45:49 CUSTOM VERSION: 1241-3178_R1B
9/9/2011 21:45:49 FILESYSTEM VERSION: WORLD-1-8_2.1.1.A.0.6
9/9/2011 21:45:49 SERIAL NO: CB511SPH7Q
9/9/2011 21:45:49
9/9/2011 21:45:49 SEMC SIMLOCK CERTIFICATE
9/9/2011 21:45:49 Elapsed:36 secs.
If the line RUNNING S1_EROM FROM VER "#8A02$" has a lowercase "r" letter replacing the "#" (RUNNING S1_EROM FROM VER "r8A02$"), your bootloader was not successfully relocked . If it has an uppercase "R" replacing the "#" (RUNNING S1_EROM FROM VER "R8A02$"), your bootloader has been successfully relocked .
Note: The value of the "$" is dependent on an unknown factor. The unknown factor doesn't matter to us.
How do I know this? Here:
Quote:
Originally Posted by the_laser in the bootloader unlock thread
a. Download the (kernel name).ftf file provided by the kernel developer b. Download and install Flashtool here (follow instructions on the website): http://androxyde.github.com/Flashtool/
(Credits go to Androxyde and Bin4ry for this tool.)
After installing it, open the flashtool folder and open the drivers folder inside that. Double click on the .exe file inside and install the ADB drivers for your phone and the flash mode drivers (needed for Flashtool to work).
Then restart your computer.
_______________________________________________
c. Put the (kernel name).ftf file in the /firmwares folder. (Don't flash any .sin files, flash only the .ftf file.) d. Open Flashtool. e. Click Flash. f. Select (kernel name).ftf. g. Turn off your phone. h. Connect your phone in flash mode (only when the popup window prompts for you to do so). (To boot into flash mode, press and hold back button while connecting your phone to the PC using an usb cable). i. Disconnect your phone (do so only when the popup window to prompts you to disconnect your phone). j. Reboot and you have a custom kernel! k. Confirm by going to Settings --> About Phone --> Kernel version. It should have the name of the kernel you flashed. m. To flash back to stock kernel, download the appropriate file below and follow steps listed above.
Benefits of unlocked bootloader: Custom kernels, recovery in kernel (no more accidents involving formating /system and having to reflash stock because recovery is gone), GPU overclock, swap support, modules loaded in kernel, conversion of /system etc to ext4 resulting in faster phone, USB host support, full support for custom roms..... The possibilities are -nearly- endless . __________________________________________________ ______________________
1. My SIM Card is not recognised after unlocking phone with msm7227_setool2.cmd! Ans: Redo unlocking procedure (step 5 onwards) using msm7227_semc.cmd.
2. I get lots of "Access is denied" messages while unlocking! Ans: Disable your antivirus and try the unlocking process again. Antivirus finds a virus in ADB.exe even though there isn't one!
3. I get some "error: protocol fault" messages! Ans: It's normal and this isn't a problem. This is because the tool is inquiring for your phone while the phone is rebooting. USB debugging mode isn't on when phone is rebooting so it causes some errors. Eventually, your phone will connect with your PC so this is not an issue.
5. Default camera doesn't work after unlocking! Ans: 1. Reflash baseband 15 again. 2. Reflash stock 2.1 using flashtool. 3. Test camera, it will have the message "Indexing Media File" on the screen. 4. Wait until it disappear from the screen. 5. Reboot 6. Test camera and it will work fine.
6. I get a lot of "daemon not started successfully" and "failed to start daemon" messages! Ans: Disconnect phone, exit the command window, reconnect phone, and try unlocking your phone's bootloader again. Repeat until there is no more of such messages and bootloader is successfully unlocked. Also, make sure you have installed Sony Ericsson PC Companion in step 1 and that it recognises your phone.
If you have a problem that is not listed above please post it in this thread __________________________________________________ ______________________
All credits go to the bootloader devs (Blagus, the_laser, maxrfon etc). And to B.Jay for the bootloader hard brick warning
You NEED to put your phone on USB Debugging mode You NEED to install make sure the Android drivers for your phone are installed Make sure you DO NOT mount your SD card. If you still can't get something to run, try doing it in recovery mode.
Read me: (READ BEFORE POSTING)
2/24/2011:
I registered my website shortfuse.org so you can grab SuperOneClick from there now.
2/22/2011:
Great news. -1Day roots AT&T Motorola Atrix4G!!! YAY!
11/29/2010:
I'm sorry I haven't been updating lately!!! The problem is, I no longer have an Android phone and I can't play around or test anymore. I'm going to see if I can find one on craiglist or ebay.
11/10/2010:
I finally figured out how to root without looping. After rooting 13 phones, this is how I did it on the first try.
Turn USB Debugging OFF
Click Root
When it says: Waiting for Device, Turn USB Debugging ON
It'll now run RATC
When it says: Starting ADB Server...
Turn USB Debugging OFF
Turn USB Debugging ON
Turn USB Debugging OFF
All BEFORE it says "Waiting for device..." again
11/1/2010:
Hey guys! I'm sorry I haven't been able to respond to lots of posts. I've been really busy lately with work. I've been reading some posts and I've made some changes in v1.5.2
Let me know what bugs and issues you guys have.
10/17/2010:
Thanks to all that donated! I was worried for a bit but you guys proved me wrong. So, I fixed the NMA (non market apps) button. It should now install sqlite3 and busybox into a temporary folder if you don't have it. I added an unroot (by popular demand). I did some major code clean up, so you can expect faster releases from here on out. Next version will add sqlite3 and busybox to the /system partition included in root.
If you're having issues with "wait for device" or if RATC is looping, try this
Unplug your USB Cable
Go to Settings > Applications > Development
Uncheck USB Debugging
Plug in your USB Cable
Unplug your USB Cable
Check USB Debugging
Plug in your USB Cable
10/13/2010:
I need people with issues to post their device model and if they tried rooting in recovery mode. All posts ignoring the read me will be ignored. (meaning nma complaints and those NAND locked devices).
I'm getting flooded with replies, PMs and emails. Seriously, try reading a few posts back.
The program has been downloaded over 5000 times and only 2 people have have donated. I see donations as signs of gratitude. Even if it's 25 cents, please donate.
When I find the time (and will) I will work on the v1.5 release.
The rageagainstthecage looping is by design. Bad usb cables and ports can cause ratc to not run properly so I have it loop until it works. The "waiting for device" hang is for the same reason. There's nothing wrong with my application. It's usually your usb cable or port. This is not a cop-out answer. This is not an excuse as if I didn't know why it happens. This has been investigated and the problem is USB connectivity. It happens with my Captivate as well.
10/11/2010:
Enabling market apps isn't working unless you have busybox installed. I plan to fix this in the next version. The problem is, different devices have different locations for the com.provider.android.settings/settings.db and I was using the 'find' command to find your settings.db location. I didn't realize this was a busybox command not internal. That will be fixed.
I also added some information about root that I think people should read and classified different root levels.
By classifying root levels, I make it easier for the users to know if certain options will work or not. For example, enabling non-market apps will only require a Level 1 root, meaning it will work with the HTC Aria
With the absolutely beautiful ADB exploit I use, titled rageagainstthecage (ratc), absolute ALL devices can be rooted. This is because it exploit is ADB which all devices use. There is an issue though. Some devices have a NAND lock which does not allow you to write to the /system mount. Because of this, you can't copy su, sqlite or busybox to /system/bin. This creates some issues but there is a work around. For things that don't need access to /system (like enabling non-market apps) I can use the ratc exploit to make those changes. If your device cannot use su in /system/bin then you can simple select a checkbox (as of v1.5) that says to use ratc.
There are 3 levels of "root" we can define:
Level 1: Shell Root (with ratc rooting the adb shell but no /system write access)
Level 2: Temporary Root (/system/bin/su installed but lost on reboot)
Level 3: Full Root (/system/bin/su installed and sticks)
Some devices have a NAND lock. SuperOneClick will only give a Shell root until you remove this lock.
THe HTC Legend and My Touch 3G 32A also have a NAND lock and need more specific methods to unlock.
The T-Mobile (HTC) G2 has something different which may or may not be a hardware flaw. I have yet to really research the device, but while it may root, it won't be permanent since copying /su to /system/bin/su has problems. I believe this is a Level 2 root, but to be honest, I need to research more.
All other devices has a Level 3 root via SuperOneClick
Version changes:
v1.9.5
Driver Installation Fix
Force Administrator on Vista/Win7
Fixed Non-Market Apps not working for some devices
v1.9.1
GingerBreak support! (I think)
v1.9
Bug fixes!
Should work better now on XP systems and Linux
v1.8
Automatic driver installation
Removed RageAgainstTheCage (no virus flags)
New folder structure
Major code clean up
v1.7
Hopefully fixed Linux hangs
Theoretical honeycomb support (still needs testing)
v1.6.5
Fixed major bug. Oops!
v1.6.4
Installs busybox to /system/xbin and installs syslinks
Added a 30 second timeout check (should eliminate all lock ups)
v1.6.3
Mounts with busybox first
Includes version in first line
v1.6.2
Fixed wrong su version being sent
Fixed issue when getting OS version
Prints device info on failure.
v1.6.1
Falls back to previous mount path method if busybox method fails
v1.6
Uses psneuter for exploit instead of rageagainstthecage by default (should root Sony Ericsson devices easily now)
Added detection for 1.x Donut/Eclair kernels
Uses busybox for getting mount path
Updated Windows ADB to latest version (I'll update the Mac/Linux ones next build)
v1.5.5
Unroot uninstalls Superuser from /data/app
Returned installation of Superuser to /system/app
v1.5.4
Fixed superuser install issue
Added a prompt to tell you to allow superuser on your phone, for the test.
Fixed unroot.
v1.5.3
Fixed ADB-pushing problem
v1.5.2
Administrative rights in Windows Vista/7 are automatically requested.
Fixed the settings.db search. (Tries default two locations, then uses busybox is all else fails).
Set Superuser to install (to data/apps) instead of copy to /system/apps. You can manually remove it from your phone like any other app. (You can also update it with the Market).
Fixed NMA not working if you didn't have Shell Root
v1.5.1
Untested Mac and Linux support (you need Mono)
v1.5
Fixed Non Market Apps
Added Unroot
Added separate Shell Root (rageagainstthecage) button
Lots of internal code clean up.
v1.4
Changed main form's name to SuperOneClick from RageAgainstTheCageGUI
Enabled Captivate - Get Unlock Code button
Added a messagebox to confirm if Non Market Applications are enabled
Made "Enable Non Market Apps" FULLY universal
Added initial message telling you to remember to allow superuser commands (when enabling Non-Market Apps)
v1.3
Removed busybox for space reasons. Changed the layout. Fixed issue where application stayed running in the background. Added Non Market App button.
v1.2
Added a detection to see if RATC was already working.
v1.1
Universal device support. Application now finds your /system path.
v1.0
Initial release.
Development Plan:
Scheduled for next major release
Linux support via mono-project
Add a check box to use su or rageagainstthecage for other scripts (like Enable NMA)
Better error handling for devices with NAND lock on /system
Have options show what level root is needed (0,1,2,3)
To do list:
Jupiter fixes
Custom scripts support
Plugin support
Mac support via mono-project
Linux support via mono-project
Wishlist:
None
Thanks to basily, I have an Captivate v2.1 nv_data.bin I can test with to create the unlock button.
I need a mac/linux user to help me. PM so we can chat on AIM/Google
Courtesy of TheUnlockr.com, here's a step-by-step video:
Mod Edit: this app will set off some anti virus software...here's a small explanation by pulser_g2:
Quote:
rageagainstthecage is a root exploit via a fork bomb.
It IS a potentially malicious payload, BUT it is being used with owner's consent to root the phone.
The DreamDroid malware use exactly same payload - they are trojans, but this is a helpful tool.
It IS a dangerous tool in the wrong hands, but this is a root exploit, so you should exercise common sense and a little understanding of what it does and how it works.

 ROOT လို႔ေရးထားတာထင္တာပဲ




 , Benefits of Custom Kernel, Common problems, Myths concerned with unlocking bootloader.

 (though some users managed to successfully unlock).

 . If it has an uppercase "R" replacing the "#" (RUNNING S1_EROM FROM VER "R8A02$"), your bootloader is NOT unlocked
