Saturday, November 23, 2013

အစရွာမရတဲ့ တရုတ္တက္ဘလက္ေတာ္ေတာ္မ်ားမ်ားကို Firmware ျပန္တင္နည္း


By Sai Arkar on Wednesday, January 9, 2013 at 9:26am
Update : 6/4/13

Latest Uberoid download -> http://www.mediafire.com/?6hppcjxi14xjqg9


v12.1:
    * market "flush" to get access to all apps is NO LONGER needed!
    * added CyPad model as option 137
    * added TekNotes ICS fixes
    * various small fixes
    * updated changers
    * merged with Leeh33's mods (
GOOD performance boosts!!!)


အစရွာမရတဲ့ တရုတ္တက္ဘလက္ေတာ္ေတာ္မ်ားမ်ားကို Firmware ျပန္တင္နည္း

နည္းနည္းေလးေနာက္က်သြားတယ္ဗ်ာ :P ဟီး (၂) ရက္ေလာက္ေပါ့ ေသခ်ာေအာင္စမ္းေနလို႕ပါ ... ။
အခုပထမဦးဆံုးလိုအပ္တဲ့ဖိုင္ေလးေတြကိုအရင္ေဒါင္းထားပါဗ်ာ ... ။
ၿပီးရင္ SD card (၁) ကဒ္ေလာက္ေတာ့လိုမယ္ဗ် ... Class ေကာင္းေကာင္း ကဒ္အသန္႕ေလးဆုိပိုေကာင္းတယ္ ... ။။ :P
မိတ္ေဆြတို႕ရဲ႕ Tablet ကို အားအျပည့္သြင္းထားလိုက္ပါ ... ဘယ္ ေလာက္သြင္းရင္ အားျပည့္မလဲဆိုတာေတာ့ ကိုယ့္ဘာသာကိုယ္ သိမွာေပါ့ေနာ္ ... ။

** SD card ကို FAT (32) format နဲ႕ Format ရိုက္ထားပါ ... ။
** ေဒါင္းၿပီးလို႕ရလာတဲ့ ဇစ္ဖိုင္ေလးကို မိတ္ေဆြတို႕ရဲ႕ SD ထဲကို Rar ျဖည္ခ်လိုက္ပါ ... ။
** ၿပီးရင္ အဲ့ဒီျဖည္ခ်တဲ့ ထဲမွာ Changer.bat ဆိုတာေလးကို RUN လိုက္ပါ ... Tablet Model name ေတြအမ်ားႀကီးေပၚလာပါလိမ့္မယ္ ... ။
** ေပၚလာတဲ့ Model ထဲက မိမိတို႕ Tablet နံပါတ္ေလးကို ရုိက္လုိက္ပါ ...
** Enter ေခါက္ၿပီးသြားရင္ SD card ကို Format ခ်မွာလား တခါေမးပါမယ္ ...( N ) လို႕ရုိက္ေပးပါ ... ။
** ေနာက္တခါ SD card ထဲကို Copy လုပ္မွာလားလို႕ ေမးပါမယ္ ... (N) ထပ္ရိုက္ေပးပါ ... ။။
** SD card ကို ကြန္ပ်ဴတာကေန Safely Remove လုပ္ၿပီး ထုတ္လိုက္ပါ ... ။
** ၿပီးရင္ မိတ္ေဆြတုိ႕ Tablet အားျပည့္ေလာက္တဲ့အခါ SD ကိုထည့္ၿပီး Power On ေပးပါ ... ။
** သူ႕ဘာသာ အလုပ္ဆက္လုပ္သြားပါလိမ့္မယ္ ... ။
** Upgarde step ေတြဆက္လုပ္သြားပါလိမ့္မယ္ ... ။
** ကိုယ္ေရြးတဲ့ Option No. မွားရင္ေတာ့ Error ေတြျပပါလိမ့္မယ္ ... ။

ဥပမာ .... Cannot upgrade Kernel (Nand) တုိ႕ ေနာက္ၿပီး Fail to mounted android data partition တုိ႕ျပရင္ ကိုယ့္ေမာ္ဒယ္နံပါတ္ကုိ ေသခ်ာေရြးေပးပါ ... ။

တကယ္လို႕ Model မွန္တယ္ မရဘူးဆိုရင္ နံပါတ္ (၂) Download ကို ဆဲြပါ ... ၿပီးရင္ Firmware install ဆိုတဲ့ Folder ထဲက Uzimage.bin ဆိုတဲ့ဟာနဲ႕ Replace လုပ္ပါ ... ။
ေနာက္တစ္ေခါက္ ထပ္ၿပီး Upgarde လုပ္ၾကည့္ပါ ... ။ မရေသးဘူး Error ျပေနေသးတယ္ဆုိရင္ နံပါတ္ (၃) download ကိုဆဲြပါ ... ။ ခုနကလိုပဲ Replace လုပ္ပါ ... ။ ထပ္လုပ္ၾကည့္ပါ
ရပါလိမ့္မယ္ .... ။

အားလံုးၿပီးသြားရင္ Please Remove SD ဆိုၿပီးေပၚလာပါလိမ့္မယ္ ... ေပၚလာရင္ SD ကိုျဖဳတ္ေပးလိုက္ပါ ... Reboot က်ၿပီး ျပန္တက္ပါလိမ့္မယ္ ... စိတ္ရွည္ပါ ... (၅) မိနစ္ကေန မိနစ္ (၂၀) ထိၾကာႏိုင္ပါတယ္ ... ။ ျပန္တက္လာရင္ Factory Reset တစ္ေခါက္ေလာက္ခ်ေပးပါ .... ။
ဒါဆိုရင္ အားလံုး အိုေကပါၿပီ ... ။

Tablet Name မသိတဲ့သူေတြအတြက္ကေတာ့ 7'' Tablet အမ်ားစုက Option 1,8,30,7  စတာေတြနဲ႕အဆင္ေျပတတ္ပါတယ္ ... ။
မိမိတို႕ Tablet က Charging သြင္းရင္ Led က ဘာအေရာင္ ပါ၀ါတက္ရင္ ဘာအေရာင္ ဆုိတာေလးေတြနဲ႕ ကိုက္ၿပီး Option ေလးေတြကိုေရြးေပးပါ ... ။
အဆင္ေျပပါလိမ့္မယ္ ... ။

ဒီနည္းလမ္းဟာ WM8650 based Tablet ေတြအတြက္ျဖစ္ပါတယ္ ... ။ ေနာက္ထပ္ ထပ္ၿပီး စမ္းသပ္ၿပီးတင္ေပးပါဦးမယ္ ... :D :D :D

Download (1) >> http://www.mediafire.com/?9cj0s706l9awm4v
Download (2) >> http://www.mediafire.com/?4dg2q2l4i1vtmkv (Uzimage)
Download (3) >> http://www.mediafire.com/?gqal02dy1mqaa1d (Uzimage)

ဆရာႀကီးေတြလိုေရးလိုက္ဦးမယ္ ဟီဟိ I won't responsible & Use at your own risk.
Credit To : Google, Technow, HCH

စိုင္းအာကာ (MMUC)

ဒီေကာင္ေလးနဲ႕ Firmware ျပန္တင္ၿပီးတဲ့အခါ Touch မရေတာ့တာေတြ ေၾကာင္ေနတာေတြျဖစ္တတ္ပါတယ္ ... အဲ့ဒီအခါ USB Mouse ေလးနဲ႕ Factory Data reset တခါခ် ၿပီးရင္ Touchpal calibration ကို ျပန္ခ်ိန္ေပးလိုက္ပါ ... ရသြားပါလိမ့္မယ္ ... ။
ဒါေလးေမ့ေနလို႕ ျပန္ေျပာတာ :P :D


ဒီေကာင္နဲ႕ Compatible ျဖစ္တဲ့ Tablet List ေတြပါ .... ။

1=MID E18 7inch
1=M009S Green LED 7inch
1=TomTec Tablet 7inch
1=Maylong M-250 7inch
2=M009S Blue LED 7inch
2=iBAK-784 7inch
2=Polaroid MPC700G 7inch
2=Epad GW-70 7inch
2=Bluetech PWS700HV 7inch
2=MIDV7 Blue LED 7inch
2=WinPad-C07 7inch
2=Ceavis 7inch
3=M003S (vt1603ts) 8inch
3=Innovatek MID 8inch
3=Top Eight KTB-07E2R 8inch
4=PC-802 8inch          
5=BLY-806 8inch
6=M80003W 8inch
6=M806B 8inch
6=MID M80006 8inch
7=Apex 7inch
7=BLY-706F v1 7inch
7=M706S 7inch
7=Kingcom Joypad 72 7inch
7=Kingcom Joypad 73 7inch
7=I-INN Kirk M77V 7inch
7=APAD (MID) 7002 7inch
7=Netbook X6-7V
7=iDea USA IUMID-0071 7inch
8=Maylong M-250 v2 7inch
8=MID703 7inch
8=Netbook WM8650 7inch          
8=V7 MID 7inch
8=ILC PC Tab701 7inch
8=KLD-MID701 7inch
8=M709W 7inch
8=Scipad 7inch
8=MID710 7inch
8=CE037B 7inch
8=Promedia Netbook Kids 7inch
8=PO7466 7inch Netbook
8=Imos A702 7inch Netbook
8=Netpad 11 7inch
8=Maipad 7inch
9=Tabtech 7inch
9=M010S 7inch
9=FlashTab 7inch
9=Xiron 7inch
9=TomTec 7inch
10=M80003W v1.5.x 8inch
10=M012S 8inch           
11=M70007T 7inch
11=ViaPad M7 7inch
11=M768A 7inch
11=Leader V70 7inch
11=Epad GW-707 7inch
12=ATF3416-7 7inch       
12=NeoPad8650 7inch
13=BLY-706F v3 7inch
13=NETPAD 11 7inch
13=Zixoon Z78 7inch
14=E16 5cun1603 5inch
15=ED99 8cun1603 8inch   
15=MID 806 8inch
15=M806S 8inch
15=L.Ausa W8 8inch
15=I-INN SPOCK M87V 8inch
15=BLY-806 8inch
15=PC-802 DT 8inch
15=Kingcom Joypad 81
16=E18 7cun1603 7inch
17=ED99 8cun8900 8inch   
18=Ricatech RATAB 10inch
18=TomTec 10inch
18=NetBook WM8650 10inch
18=Dmedia ATF3417 4G 10inch
19=M013s 10inch
19=Prixton 1001 10inch
20=ePad M009D 7inch
20=MID A713 7inch
20=Intreeo MID-WL7 7inch
21=ZX07D 7inch
22=M008s 9.7inch
23=E18_7cun1603DT152 7inch
24=E88_97cun1603153 10inch
25=IMITO Im7 1.5.1 7inch
26=puzhi_7inch_vt1609_ts 7inch
27=M01B 1.5.3 7inch
27=Pad IMO Tab X3 7inch
27=Evang TP-7001 7inch
28=TP_puzhi_7inch_vt1609_ts_152 7inch
29=M009plus 1.5.1 7inch
30=M009SBDT 1.5.3 7inch
30=M003F 7inch
30=SKU10374 7inch
30=SUPERVOX VX1107 7inch
30=DL Smart T-804 7inch
31=M731123 7inch
32=SV27C151 7inch
33=CEM8650701 7inch
34=CEM8650702 7inch
35=CEM8650801 8inch
36=CEM8650971 9.7inch
37=CEM8650972 9.7inch
38=E10 7inch Phone
38=IMO Z3 7inch Phone
39=aPad 2 9.7inch
39=J355 9.7inch
40=JSA8inch_std_vt1609 8inch
40=WP-800 8inch
41=8inch_vt1603 8inch
41=DCPAD1398 8inch
41=Atai 8650 8inch
42=8inch_vt1609_ts 8inch
42=Wintouch C08 8inch
42=Winpad C-08 8inch
43=SV28B 8inch
44=M788P 153 7inch Phone
44=wms8153_7inch_2g 7inch
45=Szstzl 7A-1 7inch
45=KS-UMPC070VA Netbook 7inch
45=SoundLogic Netbook 7inch
45=Shenzhen Kinstone Netbook 7inch
46=Szstzl 7A 7inch
47=jinghan_10inch_lvds1603_wifibtn 10inch
48=M013S_VT1603 10.1inch
48=puzhi_10.1inch_vt1603_0308 10.1inch
49=M013S_VT1609 10.1inch
49=puzhi_10.1inch_vt1609_ts_0308 10.1inch
50=Szstzl SV27D Phone 151 7inch
50=wms8153_7inch 7inch
51=Portablet 4.3inch
52=m008s_vt1603_151 9.7inch
53=m008s_vt1603_155 9.7inch
54=EZDY 9.7inch
54=iPAD 2 9.7inch
55=M003S (vt1609ts) 8inch
56=eMatic eGlide2 7inch
56=M731GA 7inch
57=M731GF 7inch
58=Sungale_Cyberus_ID702WTA_722 7inch
58=Polaroid M800 7inch
59=M009G 7inch
60=MyMIDPAD M706 7inch
60=M706B 7inch
61=MyMIDPAD M709 7inch
61=M709W 7inch
62=MyMIDPAD M806 8inch
63=TOMTOP C1212 7inch
64=USB-TEK M7001 Netbook 7inch
65=ZX07d 155 1603 7inch
66=ZX07d 155 1609 7inch
67=BLY706Fv4 7inch
68=Sungale_Cyberus_ID702WTA_722 sound fix 7inch
69=puzhi_7inch_vt1609_ts sound fix version by XJOKERX 7inch
70=BLY403_4.3inch_priv_yzx_a 4.3inch
71=BLY403_4.3inch_priv_yzx_b 4.3inch
72=PocketDroid_E403 4.3inch
73=PC-802B (ts and sound fix version by DJ_BAZS) 8inch
74=722_priv_jiutian_vt1609 7inch
75=iJoyGalatea 7inch
76=JBLITBOX8 8inch
77=Lanyu806 8inch
78=ZTAG_ZGTB007 7inch
79=X6-7V_7_Netbook 7inch
80=JBLITBOX8_TS 8inch
81=Polaroid mpc700gpr001
82=JM Bruneau 7inch
82=PI 6040H MID00-VB 7inch
83=Bluetech MM977 7inch
84=Bluetech MPCA622BT001 7inch
85=Bluetech MPCPW43BT001 8inch
85=MID800SPR001 8inch
86=CONNEX Tablette CX 7inch
86=MPCM700CX001 7inch
87=Maylong M-250 v3 7inch
88=Polaroid_mpcw43bt001 4.3inch
89=VDTECH 7inch
89=mpc700gvd001 7inch
90=706_phone_157 7inch
91=8g_705_phone_151_512mb 7inch
92=e10_phone_152 7inch
93=e10_phone_155 7inch
94=e10_phone_157 7inch
95=e10_phone_m788p_157 7inch
96=e11-b_8inch_1603_151 8inch
96=e99_8inch_1603_151 8inch
97=e18_1603_157 7inch
98=e88_97inch_0902_153 9.7inch
99=e88_97inch_200w_pixels_155 9.7inch
100=m7865 7inch
101=m80003w_s89 8inch
102=maipad_mx7650_122 7inch
103=maipad_mx7650_130 7inch
104=maipad_mx7650_2gb_153 7inch
105=maipad_mx7650_4gb_152 7inch
106=maipad_mx7651 7inch
107=maipad_mx7651_150 7inch
108=maipad_mx8650_130 8inch
109=mapan_mx7650_157-ya 7inch
110=mapan_mx7650_2gb_155-c_1609 7inch
111=mapan_mx7650_2gb_155-L 7inch
112=mapan_mx7650_2gb_155-L-F 7inch
113=mapan_mx7650_4gb_155 7inch
114=mapan_mx7650_4gb_155-t-v 7inch
115=mapan_mx7650_4gb_155-ya 7inch
116=mapan_mx7650_4gb_157-ch 7inch
117=mapan_mx8650_2gb_155-st 8inch
118=mx7650_150 7inch
119=mx7650_2gb_150 7inch
120=os-l001-18_phone 7inch
121=M709B 7inch
122=youchen_vt1603 7inch
123=MID04 7inch
124=M10phone 9.7inch (by Blaze)
125=iPad2 EZDY 9.7inch (by Blaze)
126=Polaroid MPC1000 (by ohwzo.nl)
127=wms8153_7inch_2g (by WRaven) (fixes sound/cam on some models)
128=Megatron KD-700 7inch
129=JoyPad 73 7inch
130=M010SM_2V2 7inch (by Blaze)
131=WMS8153_2g_vt1609 7inch (by Blaze)
132=BR419_L493 7inch
133=Digittex 7inch
134=Firstar MID070A 7inch
134=Firstar MID070A2 7inch
135=M7865 7inch
135=SC-70 MID 7inch
136=VivePad C77
136=iPC78 7inch tablet
137=Cypad Iview 750tpc

Saturday, September 28, 2013

နည္းပညာကို အလြန္အကြၽံသုံးစားျခင္း

http://thevoicemyanmar.com/2013/index.php/articles/item/3852-npnka.html
Written by  တင္ညြန္႔ 
ေန႔စဥ္ လူေနမႈဘဝ ပတ္ဝန္းက်င္ကို ၾကည့္လိုက္တိုင္း နည္းပညာကို မသုံးစားသူ မရွိသေလာက္ျဖစ္သည္။ ဆဲလ္ဖုန္းေတြ သုံးေနၾကသည္။ ကြန္ပ်ဴတာ၊ တက္ဘလက္ေတြႏွင့္ အလုပ္႐ႈပ္ေနၾကသည္။ ကားေမာင္းရင္းလည္း သုံးသည္။ လမ္းေလွ်ာက္ရင္းလည္း သုံးသည္။ လူတို႔၏ ေန႔စဥ္ လူေနမႈဘဝတြင္ နည္းပညာက မသုံးရမေနႏိုင္၊ မရွိမျဖစ္အသြင္ ေဆာင္လာသည္။ နည္းပညာကို သုံးစား႐ုံမက နည္းပညာျဖင့္ မထိေတြ႔ရလွ်င္ မေနႏိုင္မထိုင္ႏိုင္ ျဖစ္သည္အထိ စြဲသူေတြပင္ ရွိလာသည္။ နည္းပညာကို ဝန္းရံထားျခင္းျဖင့္ ဘဝကို တည္ေဆာက္လာၾကသည့္ ေခတ္သစ္လူေနမႈ ဟူ၍ပင္ ဆိုရမည္ျဖစ္သည္။
နည္းပညာသည္ လူသားကို အေထာက္အကူ ျပဳသည္။ ေပ်ာ္စရာေကာင္းေစရန္ ဖန္တီးေပးသည္။ စိတ္ၾကည္ႏူးခ်မ္းသာေစရန္ ေဖ်ာ္ေျဖမႈ ေပးႏိုင္သည္။ လုပ္ငန္းပေရာဂ်က္ မ်ားကို အျမန္ဆုံး ၿပီးစီးႏိုင္ေစရန္၊ ေန႔စဥ္လူတို႔ဘဝ လုပ္ငန္းေဆာင္တာမ်ားကို ပိုၿပီး ထိေရာက္ေစရန္ နည္းပညာကို မျဖစ္မေန အကူအညီ ယူၾကရသည္။ သို႔ေသာ္ နည္းပညာ၏အေထာက္အကူ ယူျခင္းေၾကာင့္ လူေနမႈဘဝအတြက္ အပ်က္သေဘာေဆာင္ေသာ ထိခိုက္မႈမ်ားလည္း ျဖစ္ေစႏိုင္သည္။ နည္းပညာကို မည္မွ်ေသာ အတိုင္းအတာအထိသာ သုံးသင့္ေၾကာင္း ျပန္လည္ဆန္းစစ္ရမည့္ အခ်ိန္ေရာက္ လာၿပီထင္သည္။
လြန္က်ဴးျခင္း ဆိုသည္မွာ မည္သည့္ေနရာတြင္ မဆို အေကာင္းထက္ အဆိုးကိုသာ ျဖစ္ေစႏိုင္ေၾကာင္း သေဘာေပါက္မည္ ထင္ပါသည္။ နည္းပညာေၾကာင့္ ျဖစ္ေပၚလာေစသည့္ အဆိုးတရား တစ္ခုတြင္ ထင္ရွားသည္မွာ ေခတ္သစ္လူတို႔၏ စိတ္မရွည္တတ္ျခင္း ျဖစ္သည္။ ထို႔ျပင္ လူသားတို႔ တစ္ဦးႏွင့္တစ္ဦး ေပါင္းသင္း ဆက္ဆံမႈႏွင့္ ဂါရဝတရား နည္းပါလာျခင္းကိုပါ ထင္ရွား သည့္ လကၡဏာတစ္ရပ္ အေနျဖင့္ ေတြ႔ျမင္လာရသည္။
တစ္ဦးႏွင့္တစ္ဦး မ်က္ႏွာခ်င္းဆိုင္ ေတြ႔ဆုံေျပာျခင္းထက္ လင္မယားခ်င္း၊ သားသမီးမ်ားကိုပင္ ဖုန္းျဖင့္ ေခၚေျပာမႈမ်ားသည္ သူစိမ္းအသြင္ ေဆာင္လာျခင္းကို ျဖစ္ေစသည္။ ေနာက္ပိုင္းတြင္ စကားေျပာဆိုရ မည္ကိုပင္ စိတ္မပါသျဖင့္ စာ (Message) မ်ားပို႔ကာ "ထမင္းစားၿပီးၿပီလား"၊ "ေနေကာင္းလား" လုပ္လာၾကသည္။ ေလကို ေခြၽတာေလ၊ အေနကြာေလ ျဖစ္သည္ကို သတိ မမူၾကျခင္းျဖစ္သည္။
ေန႔စဥ္လူေနမႈဘဝ တြင္လည္း လူတို႔၏ ေနထိုင္မႈ စ႐ိုက္မ်ား ေျပာင္းလဲလာသည္။ စာဖတ္ျခင္း ဓေလ့ထက္၊ တီဗီၾကည့္ျခင္းကို ပိုၿပီးအခ်ိန္ေပးလာသည္။ သူငယ္ခ်င္း အခ်င္းခ်င္း ေကာ္ဖီဆိုင္ထိုင္ၿပီး ရင္းႏွီးခင္မင္စြာ စကားေျပာျခင္းထက္ အြန္လိုင္းေပၚတက္ၿပီး ခ်က္တင္လုပ္ၾကသည္။ ဂ်ီေမးလ္ျဖင့္ ဆက္သြယ္ ေျပာဆိုၾကသည္။ Facebook ႏွင့္ Twitter စသည့္ လူမႈကြန္ရက္ျဖင့္ ျဖတ္လမ္းဆက္သြယ္မႈ မ်ားကို သုံးၿပီး ေပ်ာ္ေမြ႔ၾကသည္။ ထို႔ေၾကာင့္ ေန႔စဥ္ လူမႈေလာကတြင္ လူတို႔သည္ စိတ္မရွည္ျခင္း၊ စိတ္တိုျခင္း၊ သည္းခံစိတ္နည္းပါးျခင္း တို႔မွာ နည္းပညာကို အေျခခံၿပီး ေပၚေပါက္လာေသာ ေဘးထြက္ဆိုးက်ိဳးမ်ား ျဖစ္သည္။
တစ္ဦးႏွင့္တစ္ဦး ထိစပ္ေတြ႔ဆုံစရာ မလိုျခင္းသည္ အထီးက်န္ျခင္းကို ျဖစ္ေစသည္။ အဓိက ဆဲလ္ဖုန္း ႏွင့္ Facebook သည္ လူႏွင့္လူခ်င္း လူစိတ္ကင္းေစရန္ ဖန္တီးသည့္ အေၾကာက္တရားကို ျဖစ္ေစေသာ တရားခံ မ်ားျဖစ္သည္။ အထူးသျဖင့္ မ်ိဳးဆက္သစ္တို႔ လူေတာ မတိုးရဲၾကျခင္းမွာ လူခ်င္းေတြ႔ဆုံစရာ မလိုေသာ၊ ေတြ႔ဆုံ ခြင့္မေပးေသာ နည္းပညာေၾကာင့္သာ ျဖစ္သည္။
နည္းပညာသည္ လူသားခ်င္း ဆက္သြယ္မႈ ေကာင္းေစရန္ တီထြင္ဖန္တီးထားျခင္းျဖစ္သည္။ မိုင္ ေထာင္ေသာင္းေဝးကြာ ေနေသာ္လည္း ဆက္သြယ္ ေျပာဆိုႏိုင္ျခင္းသည္ နည္းပညာ၏ ေအာင္ျမင္မႈဟုလည္း ဆိုႏိုင္ပါလိမ့္မည္။ ခ်စ္ေသာသူမ်ားႏွင့္ ႐ုပ္ေလး မေတြ႔ရလွ်င္ေတာင္မွ အသံေလးၾကားၿပီး ေျဖသိမ့္ခြင့္ ရႏိုင္သည္။ ေခတ္သစ္တြင္ အေမရိကန္ေရာက္ ေဆြမ်ိဳးမ်ားကို အသံသာမက၊ ႐ုပ္ကိုပါ ေတြ႔ျမင္ၿပီး ႐ုပ္သံၾကားေျပာဆို ခြင့္ရသည္။ သို႔ေသာ္ လူတို႔ တစ္ဦးႏွင့္တစ္ဦး စိတ္ကို မရၾက။ တစ္ဦးစိတ္ကို တစ္ဦးပိုင္ဆိုင္ခြင့္၊ သိမ္းပိုက္ခြင့္၊ ေႏြးေထြးစြာ ေထြးပိုက္ခြင့္မ်ား မရၾကေပ။
ယေန႔ေခတ္သည္ မိုးလင္းသည္ႏွင့္ အီးေမးလ္ စစ္မည္။ စာတို စာရွည္ေတြ ရွာမည္။ အြန္လိုင္းကို ေရွာ့ပင္ထြက္မည္။ Facebook ကို အငမ္းမရစြာျဖင့္ စားသုံးမည္။ ကိုယ့္ Status ကို Update ျဖစ္ေအာင္ လုပ္မည္။ YouTube ကတစ္ဆင့္ ဗီဒီယိုဖိုင္ေတြ ရွာၾကည့္မည္။ သိခ်င္တာေတြ အင္တာနက္မွ ေမႊေႏွာက္မည္။ တစ္ေန႔လုံး မည္သူ႔ကိုမွ် စကားတစ္လုံးေျပာစရာ မလိုဘဲ အခန္းက်ဥ္းေလးထဲတြင္ အခ်ိန္ကုန္သြား ႏိုင္သည္။ အေဖ၊ အေမကို ထြက္ေတြ႔စရာမလို။ သူငယ္ခ်င္း မ်ားႏွင့္ ကစားစရာမလို။
စတန္းဖို႔ဒ္တကၠသိုလ္၏ စစ္တမ္းတစ္ခုတြင္ အင္တာနက္ အသုံးမ်ားေလ သူငယ္ခ်င္းမ်ားႏွင့္ ေတြ႔ဆုံ ခ်ိန္နည္းေလျဖစ္ၿပီး၊ ေနာက္ဆုံး လူ႔ေဘာင္ေလာကႏွင့္ ကင္းကြာေလျဖစ္သည္ဟု ဆိုသည္။ သို႔ေသာ္ အင္တာနက္ သုံးသူေတြကလည္း တစ္ေန႔တျခား တိုးပြားၿပီးရင္း တိုးပြားေနသည္။ ႐ုံးမွ အိမ္ျပန္လာေသာ ဖခင္ကလည္း ႐ုံးအလုပ္ေတြကို အိမ္ေရာက္သည္အထိ မရပ္မနား လုပ္ေနသည္။ ကြန္ပ်ဴတာႏွင့္မ်က္ႏွာ မခြာႏိုင္ေသာ လင္ေယာက်္ားကို ဇနီးသည္က ထမင္းစားမေခၚဝံ့။ သား သမီးေတြကလည္း ခြၽဲႏြဲ႕ခြင့္မရ။ ေနာက္ဆုံး မိသားစု၏ သာယာေသာဘဝေလး ေပ်ာက္ဆုံးသြားသည္။
မိခင္ဖခင္တို႔ႏွင့္ အိမ္ေထာင္ေရးလစ္ဟာခ်က္ မ်ားကို သားသမီးေတြက အတုျမင္ အတတ္သင္ၾကသည္။ မည္သို႔ ေနေနရသည္ဆိုသည့္ လူ႔အဖြဲ႕အစည္းအတြင္း လူျဖစ္လာၾကရေသာ လူငယ္တို႔ကလည္း ေနာင္ အနာဂတ္တြင္ အထီးက်န္ တိတ္ဆိတ္ေသာ လူ႔ေဘာင္ တစ္ခုကို မိဘေတြပုံစံအတိုင္း တည္ေဆာက္ၾကလိမ့္မည္။ သို႔ျဖစ္ရာ အနာဂတ္ အိမ္ေထာင္သည္ဘဝသည္ ေတြးဆစရာမ်ား ျဖစ္လာလိမ့္မည္။
လူတစ္ေယာက္တြင္ လူမႈေရးႏွင့္ ခံစားခ်က္မ်ားကို မွ်ေဝပိုင္ခြင့္မရွိလွ်င္ သို႔မဟုတ္ မွ်ေဝခံစားမႈ မ်ားကို လုပ္ခ်င္စိတ္မရွိလွ်င္ အထီးက်န္ျခင္းေဝဒနာကို ခံစားလာရမည္သာ ျဖစ္သည္။ ထိုေဝဒနာသည္ စိတ္ဓာတ္က်ျခင္း (Depression) ၏ အေျခခံျဖစ္သည္။ ယေန႔ေခတ္ လူေနမႈဘဝတြင္ စိတ္က်ေဝဒနာသည္မ်ား တိုးပြားလာျခင္းသည္ အထီးတည္း ေနထိုင္၍ ရလာျခင္း၊ အထီးတည္းေနထိုင္ ရလာေစရန္ နည္းပညာမ်ားက ပံ့ပိုး ကူညီေနျခင္းမ်ားေၾကာင့္သာ ျဖစ္သည္။ နည္းပညာ ဖြံ႕ၿဖိဳးတိုးတက္လာျခင္းေၾကာင့္ ႐ုပ္ဝတၳဳပိုင္းတြင္ ေျပာစရာ မလိုေသာ္လည္း စိတ္ဓာတ္ေရးရာမ်ား ခြၽတ္ၿခံဳက်လာျခင္းမွာ ဆင္ျခင္စဥ္းစားစရာ ျဖစ္သည္။
နည္းပညာေၾကာင့္ က်န္းမာေရးေကာင္းေစရန္ မည္မွ် စြမ္းေဆာင္ႏိုင္သည္ဆိုေစ၊ နည္းပညာေၾကာင့္ ခြၽတ္ယြင္းလာေသာ မက်န္းမာမႈမ်ားကလည္း အတိုင္း အဆမရွိျဖစ္လာေၾကာင္းကို သတိျပဳသင့္သည္။ ဆဲလ္ ဖုန္းသုံးျခင္းေၾကာင့္ ဦးေႏွာက္ကင္ဆာ ျဖစ္ပြားႏိုင္သည္ ဆိုေသာ သတင္းမ်ားကို ၾကားေနရေသာ္လည္း အေကာင္အထည္ျပႏိုင္မႈ နည္းသျဖင့္ သုံးစြဲသူမ်ား ပိုၿပီး တိုးတက္ေနသည္။
လူတိုင္း အီထ႐ြန္နစ္ သံလိုက္စက္ကြင္းမ်ားႏွင့္ ေရဒီယိုဓာတ္ေရာင္ျခည္ မ်ားကို တစ္နည္းမဟုတ္ တစ္နည္း ခံစားရႏိုင္သည္။ ထိုဓာတ္သတၱိမ်ား ထုတ္ႏိုင္သည့္ ပစၥည္းေတြကိုလည္း ေနရာအႏွံ႔ သုံးစြဲေနၾကသည္။ နည္းပညာအရ ဖန္တီးထားသည့္ ပစၥည္းတစ္ခုခုကို လုပ္ငန္းခြင္၊ အိမ္၊ ေက်ာင္းပတ္ဝန္းက်င္ အႏွံ႔ သုံးစြဲေနၾကသည္။ ဥပမာ Wi-Fi ဆက္သြယ္ေရးလိႈင္းမ်ား၊ လွ်ပ္စစ္ပါဝါ လိုင္းႀကဳိးမ်ား၊ ဆဲလ္ဖုန္းတို႔က ထုတ္လႊတ္သည့္ ဖရီကြင္စီ လိႈင္းမ်ား၊ ၿဂိဳဟ္တုတီဗီမ်ားက ထုတ္လႊတ္သည့္ လိႈင္းမ်ား၊ ေပါင္မုန္႔ကင္စက္၊ အဝတ္ေလွ်ာ္စက္၊ ဆံပင္အေျခာက္ခံစက္၊ မိုက္ခ႐ိုေဝ့ဗ္ မီးဖိုစသည့္ ပစၥည္းမ်ားၾကားတြင္ လူသားေတြက လႈပ္ရွားက်င္လည္ေန ၾကရသည္။ သို႔ျဖစ္ရာ ပတ္ဝန္းက်င္ရွိ အႏၲရာယ္ဖရီကြင္စီ လိႈင္းမ်ားၾကားတြင္ လူသားသည္ ခံႏိုင္ရည္ရွိသေလာက္ သာ ရွင္သန္ခြင့္ရၾကသည္။
နည္းပညာဖရီကြင္စီ မ်ားက လူသား၏႐ုပ္ပိုင္းဆိုင္ရာ က်န္းမာမႈမ်ားကို အမွည့္ေျခြသလို ေျခြေနသည္။ သို႔ေသာ္ ႏွလုံးေရာဂါ၊ ကင္ဆာစသည့္ အေကာင္အထည္ ျပႏိုင္ေသာ အမည္သတ္မွတ္လိုက္သည့္ ေရာဂါမ်ားျဖင့္ လူေတြေန႔စဥ္ ေသေနၾကရ သည္ကိုသာ သတိမူၾကၿပီး အဘယ္ေၾကာင့္ ထိုေဝဒနာမ်ား ျဖစ္ရသည္ ဆိုျခင္းကိုမူ သတိမမူမိၾကေပ။
EMF (Electromagnetic Frenquencies) မ်ားသည္ သက္ရွိတို႔၏ ခႏၶာကိုယ္မွ ဆဲလ္မ်ားကို ဖ်က္ဆီး တတ္ပါသည္။ EMF ဖရီကြင္စီကို အလြန္နိမ့္ေသာႏႈန္း 16Hz ခန္႔ ၾကက္သားေပါက္မ်ားအနီးတြင္ ထုတ္လႊင့္ၾကည့္ရာ ထိုၾကက္ကေလးမ်ား ဦးေႏွာက္အတြင္း ကယ္လ္စီယမ္ အိုင္ယြန္ဓာတ္မ်ား ေက်ပ်က္သြားေၾကာင္း ေတြ႔ရသည္။ ထိုဓာတ္သည္ သက္ရွိတို႔၏ ဦးေႏွာက္အတြင္းရွိ အေျမႇးပါးမ်ား တစ္ခုႏွင့္တစ္ခု တြယ္ကပ္ေနေစရန္ အားေပးသည့္ဓာတ္မ်ား ျဖစ္သည္။ သို႔ျဖစ္ရာ လူသားတို႔ ဦးေႏွာက္ပိုင္းဆိုင္ရာ ေရာဂါမ်ား အဘယ္ေၾကာင့္ ခံစားေနရေၾကာင္းကိုလည္း ဆန္းစစ္ရန္ လိုလာပါသည္။
အျခားေလ့လာမႈ တစ္ခုတြင္ ကိုယ္ဝန္ေဆာင္စဥ္ ဆဲလ္ဖုန္းကို အသုံးျပဳေသာမိခင္က ေမြးဖြားလာသည့္ ကေလးတစ္ဦးႏွင့္ အသက္ ၇ ႏွစ္သား အ႐ြယ္ခန္႔တြင္ ဆဲလ္ဖုန္းကို ေပးသုံးသည့္ ကေလးတစ္ေယာက္ တို႔တြင္ ျဖစ္ပြားေသာ စိတ္ခံစားမႈဆိုင္ရာ တုံ႔ျပန္ခ်က္ႏွင့္ ဦးေႏွာက္ပိုင္းဆိုင္ရာ ေရာဂါလကၡဏာ မ်ားသည္ ၈၀ ရာခိုင္ႏႈန္းခန္႔ တူညီေနေၾကာင္း ေတြ႔ရသည္။
အျခားသတိမူသင့္သည့္ ေရာဂါေဝဒနာ တစ္ခုမွာ လြန္ခဲ့သည့္ ႏွစ္ေပါင္းႏွစ္ဆယ္ ခန္႔ေလာက္ကတည္းက စတင္ၿပီး အဝလြန္သူမ်ား တိုးပြားလာျခင္း ျဖစ္သည္။ နည္းပညာကို အလြန္အကြၽံ စားသုံးလာျခင္းႏွင့္ အဝလြန္ျခင္းတို႔ ျဖစ္ပြားလာသည့္ ခုႏွစ္မ်ား ထပ္တူက်ေနျခင္းကို တိုက္ဆိုင္မႈဟု မဆိုႏိုင္ေပ။ ၂၀၁၁ ခုႏွစ္ထုတ္ အေမရိကန္ သိပၸံမဂၢဇင္းတြင္ ၁၉၇၀ ျပည့္ႏွစ္ေလာက္ ကတည္းက အဝလြန္သူမ်ား တိုးပြားလာျခင္းကို အင္တာနက္ႏွင့္ နည္းပညာ သုံးစြဲမႈမ်ားႏွင့္ ဂရပ္မ်ဥ္းဆြဲကာ ႏိႈင္းယွဥ္ ျပသထားမႈမွာ စိတ္ဝင္စားစရာျဖစ္သည္။ ပညာရွင္တို႔ ေလ့လာေတြ႔ရွိခ်က္တြင္ အထိုင္မ်ားျခင္း၊ ေလ့က်င့္ခန္း နည္းျခင္း၊ အသြားအလာနည္းျခင္း၊ လႈပ္ရွားမႈနည္းျခင္း၊ အစားအေသာက္ အေနအထိုင္ပုံစံမ်ား ေျပာင္းလဲလာျခင္း တို႔က အဝလြန္ျခင္းကို ျဖစ္ေစသည္။ အဝလြန္ျခင္း၏ ေနာက္ကြယ္တြင္ ခံစားရမည့္ ေဝဒနာေတြက မ်ားလွသည္။ ယေန႔ေခတ္ လူသားအားလုံး ထိုေနာက္ဆက္တြဲေဝဒနာ မ်ားကို တစ္နည္းမဟုတ္ တစ္နည္း ခံစားေနၾကရသူမ်ား ျဖစ္သည္။
နာမည္ေက်ာ္ အေမရိကန္စာေရးဆရာ၊ ကဗ်ာ ဆရာ၊ ဒႆနဆရာ၊ သဘာဝေဗဒပညာရွင္ ေဒးဗစ္ ေသာ႐ိုး၏ အယူအဆတစ္ခုကို ေဖာ္ျပလိုပါသည္။ ေသာ႐ိုးက -
"လူသားတြင္ ဇိမ္ခံျခင္းႏွင့္ သက္ေသာင့္ သက္သာျဖစ္ေစရန္ ႀကံေဆာင္ျခင္းတို႔သည္ မရွိမျဖစ္ လိုအပ္ခ်က္မဟုတ္ေပ။ ယင္းအခ်က္မ်ားသည္ လူသား သဘာဝကို ဖ်က္လိုဖ်က္ဆီး လုပ္မည့္ အေႏွာင့္အယွက္ အတားအဆီးမ်ားသာ ျဖစ္သည္" ဟု ဆိုခဲ့ပါသည္။
ေသာ႐ိုးသည္ လူ႔သဘာဝ၊ လူ႔ပတ္ဝန္းက်င္၏ တီထြင္ဆန္းသစ္ခ်က္မ်ားကို မႏွစ္သက္။ ထို႔ေၾကာင့္ ေတာထဲတြင္ တစ္ဦးတည္း သြားေနၿပီး သဘာဝတြင္ လူသားသည္ မည္သည့္ဆန္းသစ္တီထြင္မႈမွ် မပါဘဲ ႐ိုးသားစြာ ေနထိုင္ႏိုင္ေၾကာင္းကို လက္ေတြ႔ျပသႏိုင္ ခဲ့သူျဖစ္သည္။
နည္းပညာသည္ ဆန္႔က်င္ရန္မဟုတ္ပါ။ နည္းပညာသည္ ျမတ္ႏိုးစရာ ေကာင္းေသာ္လည္း အလြန္အကြၽံ မွီခိုသုံးစားျခင္းကိုမူ ေရွာင္ရွားသင့္ပါသည္။ နည္းပညာသည္ မာယာမ်ားလွသည္။ ဆြဲေဆာင္အား ကလည္း ေကာင္းလွသည္။ နည္းပညာႏွင့္ လြတ္ကင္းစြာ မည္မွ် ေနထိုင္ႏိုင္သည္ ဆိုျခင္းမွာ အနာဂတ္အတြက္ အသက္ရွည္ရာ၊ အနာမဲ့ေၾကာင္း၊ ေဆးဝါးေကာင္းတစ္ခု ျဖစ္လာႏိုင္မည္ ထင္ပါသည္။

Tuesday, September 24, 2013

Frozen Keyboard Pro Crack Version

Frozen Keyboard Pro Crack Version
=======================
Frozen Zawgyi KeyPro Crack Version
ဘယ္ေတာ့မွ experia date မျဖစ္ေတာ့ဘူး
လိုခ်င္ရင္ ေအာက္မွာ ေဒၚင္းလိုက္ . . ..

Link 1 => http://www.mediafire.com/?5a5g5f87szdclws

Link 2 => http://www53.zippyshare.com/v/22497614/file.html

အားလံုးေသာ ညီအစ္ကိုေမာင္ႏွမမ်ား Good Luck~~~ ေတြ႕လို႕တင္ေပးတာ ကိုယ္တိုင္ Crack လုပ္ထားတာလဲမဟုတ္ဘူး..ဒီထဲမယ္ ဒီ Frozen Keyboard အေၾကာင္းသိတဲ့သူေတြလဲပါမယ္ဆိုတာသိေနပါတယ္..ဒါေပမယ့္ အမ်ားအတြက္ ေတြ႕တာေလးတင္ေပးလိုက္တာျဖစ္တဲ့အတြက္ ေက်းဇူးျပဳၿပီးမဆဲဘဲ မ်က္စိမွိတ္ေနေပးပါလို႕....

Backing Up Your iPhone

Instructions

  1. Backing Up Your iPhone

    • 1
      Make sure your iPhone is turned on and functioning. Plug the iPhone-compatible USB cable into a USB port on your computer, and then plug the cable into your iPhone. Your computer will recognize the iPhone, install the necessary drivers and start iTunes. (If this is the first time you have connected your iPhone to this computer, iTunes will check your phone to make sure that its software and firmware are up to date. If either is not, you'll be prompted to update the phone. You should choose "Yes." The update process takes several minutes. When it's finished, the iPhone reboots and the phone is displayed under the "Devices" section in the left column of the iTunes interface.)
    • 2
      Click your iPhone in the "Devices" section of the left column of iTunes. This displays a screen with information about the phone, such as the phone's name, storage capacity, serial number and so on. You can also use this section to sync your phone with your computer, which is slightly different from backing up the device. iTunes will automatically sync your phone with your computer each time you connect the two devices.
    • 3
      Right-click your iPhone in the "Devices" section of iTunes and choose "Backup" from the fly-out menu. Your iPhone is now backed up to your computer.

    Restoring Your iPhone

    • 4
      Make sure your iPhone is turned on and functioning. Plug the iPhone-compatible USB cable into a USB port on your computer, and then plug the cable into your iPhone. Your computer will recognize the iPhone and start iTunes
    • 5
      Click your iPhone in the "Devices" section of the left column of iTunes. This displays a screen with the aforementioned information about the phone.
    • 6
      Click the "Summary" tab, and then click "Restore. iTunes prompts you to back up your phone. Unless you have just backed it up, you should choose "Back Up." iTunes prompts you again, asking if you want to restore the phone. Click "Restore." When the restoration completes, click "OK." iTunes displays the "Set Up Your iPhone" dialog box.
    • 7
      Click "Restore from the backup of..." . Then, click the drop-down menu and choose the iPhone backup set you want to restore to your phone. The backups are listed on the menu by date. Say, for example, you're restoring your phone because it stopped functioning properly. In this case, you would choose the backup on the latest date before the phone started acting up.

Download iOS 5.1.1 for iPhone, iPad, iPod Touch

iOS 5.1.1 firmware for iPhone, iPad and iPod Touch is now available for download. Apple has just released iOS 5.1.1 update for iPhone 4S, iPhone 4, 3GS, iPad and iPod Touch. iOS 5.1.1 brings improvements and bug fixes. You can download iOS 5.1.1 from below.
Hit the jump for iOS 5.1.1 IPSW direct download links and the change-log:
download ios 5.1.1
iOS 5.1.1 Change-log
  • Improves reliability of using HDR option for photos taken using the Lock Screen shortcut
  • Addresses bugs that could prevent the new iPad from switching between 2G and 3G networks
  • Fixes bugs that affected AirPlay video playback in some circumstances
  • Improved reliability for syncing Safari bookmarks and Reading List
  • Fixes an issue where ‘Unable to purchase’ alert could be displayed after successful purchase
The previous version of iOS: iOS 5.1 was released back in March. iOS 5.1.1 is available through iTunes and also as an over-the-air update of just 47.3 MB.

Download iOS 5.1.1

Download iOS 5.1.1 for iPhone 4S

Download iOS 5.1.1 for iPhone 4

Download iOS 5.1.1 for iPhone 3GS

Download iOS 5.1.1 for The New iPad

Download iOS 5.1.1 for iPad 2

Download iOS 5.1.1 for iPad 1

Download iOS 5.1.1 for iPod Touch 4G

Download iOS 5.1.1 for iPod Touch 3G

ဖုန္းၾကိဳတင္ ေငြျဖည္႔ကတ္မ်ား ကို ဆိုင္အေရာက္ပို႔ေဆာင္ေပးေနပါသည္။

GSM, CDMA 800, CDMA 450, MECTEL,Go there myanmat Card, Ytalk  အစရိွသည္႔ ဖုန္း ၾကိဳတင္ေငြျဖည္႔ကတ္ အမ်ိဳးမ်ိဳး ကို အင္းစိန္ျမိဳ႔နယ္ ႏွင္႔လိႈင္သာယာ ျမိဳ႕ နယ္ အတြင္း ဆိုင္ အေရာက္
ပို႕႔ေဆာင္ေပးေနပါသည္။ ေစ်းႏႈန္း ခ်ိဳသာျခင္း၊အခ်ိန္ကုန္ သက္သာျခင္း၊လမ္းစရိတ္ သက္သာျခင္း အစရိွသည္႔ အက်ိဳးအျမတ္မ်ား ကို ရရိွေစရပါမည္။
ဆက္သြယ္ရန္ ဖုန္း ၀၉ ၄၄၈၀၀၁၂၃၅။ ၀၉ ၂၅၄၀၄၇၆၄၀။၀၉၂၅၀၅၁၇၈၇၁။၀၁၆၄၆၃၄၀။

Monday, September 23, 2013

MECTEL hello Music service မသံုးခ်င္ေတာ႔ရင္

333 ကို unregister လို႕     SMS ပို႕လိုက္ပါ။

Direct download links for iOS 7 & 7.0.1

Direct download links for iOS 7 & 7.0.1

iOS-7-091
Following Apple’s release of iOS 7 earlier today as an almost 1GB OTA update, direct download links have now made their way online. iOS 7.0 (build 11A465) is available now for your iPhone 4, 4S, 5, and iPad 2 and up, but Apple also has iOS 7.0.1 (build 11A470a) available for the new iPhone 5S and iPhone 5C as we noted earlier today. If you are having trouble with the over the air update, or just want to do a completely fresh install, you’ll be able to use the direct download links above to do so.
If you are going that route, you’ll want to make sure you are updated to the latest iTunes 11.1 released earlier today with iTunes Radio, Genius Shuffle, Podcast Stations, and, of course, support for iOS 7 devices.
iPad:
iPad2(wifi) (iPad2,1) 7.0 (11A465)
iPad2(at&t) (iPad2,2) 7.0 (11A465)
iPad2(vz) (iPad2,3) 7.0 (11A465)
iPad2,4 (iPad2,4) 7.0 (11A465)
iPad2,5 (iPad2,5) 7.0 (11A465)
iPad2,6 (iPad2,6) 7.0 (11A465)
iPad2,7 (iPad2,7) 7.0 (11A465)
iPad3,1 (iPad3,1) 7.0 (11A465)
iPad3,2 (iPad3,2) 7.0 (11A465)
iPad3,3 (iPad3,3) 7.0 (11A465)
iPad3,4 (iPad3,4) 7.0 (11A465)
iPad3,5 (iPad3,5) 7.0 (11A465)
iPad3,6 (iPad3,6) 7.0 (11A465)
iPhone:
iPhone4 (iPhone3,1) 7.0 (11A465)
iPhone3,2 (iPhone3,2) 7.0 (11A465)
iPhone4(vz) (iPhone3,3) 7.0 (11A465)
iPhone4S (iPhone4,1) 7.0 (11A465)
iPhone5,1 (iPhone5,1) 7.0 (11A465)
iPhone5,2 (iPhone5,2) 7.0 (11A465)
iPhone5,3 (iPhone5,3) 7.0.1 (11A470a)
iPhone5,4 (iPhone5,4) 7.0.1 (11A470a)
iPhone6,1 (iPhone6,1) 7.0.1 (11A470a)
iPhone6,2 (iPhone6,2) 7.0.1 (11A470a)
iPod touch:
iPodTouch(5G) (iPod5,1) 7.0 (11A465)

Saturday, September 21, 2013

EZ Charge

https://www.copy.com/s/im90zvcOrjWy/EZ%20Charge%20by%20www.myanmarmobileapp.com.apk
http://www21.zippyshare.com/v/11846305/file.html
 သက္နုိင္စုိး ဖုန္းေငြျဖည့္ကဒ္ကုိ ဖုန္းနဲ႕ရြယ္လုိက္ရုံနဲ႕ ေငြျဖည့္နုိ္င္မယ့္ EZ Charge for Android Share This Add to Delicious Share on FriendFeed Digg submit to reddit Tags GSM/CDMA Prepaid ေငြျဖည့္ကဒ္ေတြကုိ စာရုိက္ေငြျဖည့္ရမွာပ်င္းသူေတြအတြက္ ဖုန္းေငြျဖည့္ကဒ္ကုိ ဖုန္းနဲ႕ရြယ္လုိက္ရုံနဲ႕ ေငြျဖည့္နုိ္င္မယ့္ EZ Charge for Android ကုိတင္ေပးလုိက္ပါတယ္။ ပုံမွာျပထားတဲ့အတုိင္း ဒီေဆာ့၀ဲေလးထဲ၀င္ျပီး ေငြျဖည့္ကဒ္က code ကုိခ်ိန္ရြယ္လုိက္တာနဲ႕ code ကဖုန္းေပၚမွာေပၚလာပါမယ္။ ျပီးရင္ ေအာက္က Prefix အကြက္မွာ GSM ဆုိ *123* ရုိက္ပါ။ နမူနာေျပာျပတာေနာ္ ။ အျခားဖုန္းေတြဆုိရင္ ကုိယ့္ sim card နဲ႕သက္ဆုိင္တာေပါ့။ ေနာက္တစ္ကြက္မွာဘာမွရုိက္ဖုိ႕မလုိပါဘူး။ ျပီးရင္ Dial ခလုတ္ေလးကုိႏွိပ္ျပီး ေငြျဖည့္ရုံပါပဲ။ ေတာ္ေတာ္ေလးအဆင္ေျပေစမွာပါ။ Scan ဖတ္ေနတဲ့အခ်ိန္မွာလက္ျငိမ္ဖုိ႕ေတာ့လုိတယ္ေနာ္။

Tuesday, September 17, 2013

USB DRIVER

ကဲ ဒီတစ္ခါေတာ့ဗ်ာ….ဖုန္းနဲ႔ ပတ္သက္ၿပီး ဘာပဲ ကလိခ်င္ရင္ၿဖစ္ၿဖစ္..အရင္ဆံုးကြ်န္ေတာ္တို႔ လိုတာ Driver ပါ။ အဲဒီေတာ့ ဒီမွာ ကြ်န္ေတာ္မွာ ရွိသမွ် Driver ေလးေတြကို စုစည္းတင္ေပးလိုက္ပါတယ္။


No.1_အေနနဲ႔ လူသံုးအမ်ားဆံုးၿဖစ္တဲ့ Huawei ဖုန္းေတြအတြက္ ဒီမွာ ယူပါ။
>> http://mc.tt/aaxzzQTFkC
>> https://www.box.com/s/anecbccugwofnkioyfi3
>> http://www.mediafire.com/download.php?v30n3mmhe47dw3i အဲဒီေကာင္ေလးက Huawei တိုင္းနဲ႔ အဆင္ေၿပပါတယ္။ ကြ်န္ေတာ္ကိုယ္တိုင္ လက္ရွိသံုးေနတဲ့ေကာင္ေလးပါ။
>> http://mc.tt/44yAAVyz0S
>> https://www.box.com/s/taaj6ijubs7rb19fv22y
>> http://www.mediafire.com/download.php?f6hnjqgxqc8c2xx ဒါေလးကေတာ့ TeamAndroid ကေန ယူလာတဲ့ေကာင္ေလးပါ။ သူကေတာ့ ဒါရိုက္ Run လို႔ မရပါဘူး။ Driver လိုလို႔ ေတာင္းတဲ့အခါမွာ Menual အေနနဲ႔ Location ကို ေရြးေပးၿပီး သြင္းေပးရတဲ့ေကာင္ ၿဖစ္ပါတယ္။ အေပၚက ေကာင္နဲ႔ အဆင္မေၿပခဲ့တာမ်ိဳးရွိခဲ့ရင္ သံုးလို႔ ရေအာင္ပါ။

No.2_ဒုတိယအေနနဲ႔ လူသံုးမ်ားၾကတာကေတာ့ Samsaung ပါ။ အဲဒီေတာ့ ဒီမွာ ယူၾကပါ။
>> http://mc.tt/2ayBbg3i1m
>> https://www.box.com/s/oytx4kyi7xlxr89aj73h
>> http://www.mediafire.com/download.php?9k0b7bob84mxdxc ဒါကေတာ့ Samsaung တိုင္းအတြက္ အဆင္ေၿပပါတယ္။

No.3_ Sony အတြက္ေပါ့ဗ်ာ။သူကေတာ့ ကြ်န္ေတာ္ သိသေလာက္ေတာ့ USB Driver အေနနဲ႔ သက္သက္မရွိဘူးခင္ဗ်။ သူ႔အတြက္ကေတာ့ Sony PC Companion ပဲရွိပါတယ္။အဲဒါက Sony ဖုန္းေတြမွာ Built in အေနနဲ႔ ပါပါတယ္။ ဒါေပမယ့္ စံုေအာင္ တင္ေပးလိုက္ပါတယ္။ လိုခ်င္သူမ်ားကေတာ့ ယူပါ။
>> http://mc.tt/61yBcmJcIC
>> https://www.box.com/s/23oqft8h85zn71002ukr
>> http://www.mediafire.com/download.php?3vs8rp1scl4jw4f

No.4_ Nokia ေပါ့ေနာ္။ အဲေကာင္မွာလည္း USB Driver အေနနဲ႔ သက္သက္ေတာ့ ကြ်န္ေတာ္ မေတြ႔ပါဘူး။Nokia Suite ဆိုတာပဲ ရွိပါတယ္။ သူလည္း Built In အေနနဲ႔ ပါပါတယ္။
လိုခ်င္သူမ်ားကေတာ့ ဒီမွာယူပါ။
>> http://mc.tt/64yBgDLTKo
>> https://www.box.com/s/auh3vsb022osm7f7ql0z
>> http://www.mediafire.com/download.php?6lsr649aijs52yv

No.5_ HTC အတြက္ပါ။ သူကေတာ့ USB Driver အေနနဲ႔ .exe ဖိုင္ေလးပါ။ ေတာ္ေတာ္အဆင္ေၿပပါတယ္။ လိုခ်င္သူမ်ား ဒီမွာေနာ္။
>> http://mc.tt/a1yBiO7G7U
>> https://www.box.com/s/hsvnb8p4xxd0qycvvkdi
>> http://www.mediafire.com/download.php?avmkc1u9bj27e9h

No.6_ ZTE အတြက္ပါ။ လိုခ်င္ ဘယ္လိုက္ရွာလို႔ ရွာရမွန္းမသိေအာင္ ၿဖစ္ေနတဲ့ေကာင္ေလးဗ်ာ။ ဟီး လိုခ်င္ေအာင္ ဆြယ္လိုက္တယ္။
>> http://mc.tt/acyBnguawc
>> https://www.box.com/s/wvbnz3lq0aqb62rcauge
>> http://www.mediafire.com/download.php?zldrds79c06d6kp ယူလိုက္ၾကေနာ္။

No.7_ Intel ဖုန္းေတြအတြက္ပါ။ သူလည္း လူသံုးမမ်ားေပမယ့္ လိုခ်င္ရင္ ဘယ္မွာ ရွာရမွန္းမသိဘူးခင္ဗ်ာ။
လိုခ်င္သူမ်ားကေတာ့ ယူလိုက္ပါ။
>> http://mc.tt/48yAC7Ummo
>> https://www.box.com/s/cj2frrx54bzhg3nklog3
>> http://www.mediafire.com/download.php?4loeq6vh5ly7ndx

No.8_ LG ဖုန္းေတြ အတြက္ေနာ္။ လိုခ်င္သူမ်ား ရွိမယ္လို႔ ထင္ပါတယ္။
ကဲ..ယူလိုက္ပါ။
>> http://mc.tt/10yAFoW3pa
>> https://www.box.com/s/639kwgkm6faosmyd3ay1
>> http://www.mediafire.com/download.php?a1zkmxbbc7iz7er

No.9_ Motorola ဖုန္း အမ်ိဳးအစားေတြအတြက္ Driver ေလးေတြပါ။
ေဟာဒီမွာက Window ေတြ အတြက္ပါ။
>> http://mc.tt/aeyAJFYKsW
>> https://www.box.com/s/bgv9dhww4xrj3hvlv5x8
>> http://www.mediafire.com/?777r89qajfgmzx1
ဒါက Linux သံုးသူေတြအတြက္
>> http://mc.tt/bayAMWZrvI
>> https://www.box.com/s/nl2gg4072tmcwo5w8gss
>> http://www.mediafire.com/?6hdee8kh0b8bgwk
ဒါကေတာ့ W series W370,W375,W376g,W377 ေတြ အတြက္ပါ။
>> http://mc.tt/0fyCBshQny
>> https://www.box.com/s/ik5krqp6hj2nprs3gwzu
>> http://www.mediafire.com/download.php?jnzyhi8h8h3568o
ဒါက W series W216,W230,W230x,W23x,W259,W270,W270x,W27x,W388,W396,W397,W397v ေတြ အတြက္ပါ။
>> http://mc.tt/54yCAnBXHi
>> https://www.box.com/s/iboft8is7k2qh0xtk4hc
>> http://www.mediafire.com/?p236cl9m2z11fi9

No.10_ ASUS ဖုန္းေတြ အတြက္ပါ။ဒီမွာ ယူပါ။
>> http://mc.tt/c0yBoma4cs
>> https://www.box.com/s/agimtm9hjvxj6yao4oyp
>> http://www.mediafire.com/?1t1ca4tew421ba9
ဒါကေတာ့ Asus Nexus 7 အတြက္
>> http://mc.tt/4byBybf9lM
>> https://www.box.com/s/ieyxfpq4ep5td4owpoum
>> http://www.mediafire.com/download.php?axxxdwrvvmxkkkg

No.11_ Dell ဖုန္းေတြ အတြက္ သူကေတာ့လူသံုး အင္မတန္ကို နည္းပါတယ္။ သူရဲ႕ Driver အတြက္ကေတာ့ အင္တာနက္ရွိဖို႔ လိုပါတယ္။ ေအာက္ကေကာင္ေလးကို ယူပါ။ ဖုန္းကို ကြန္မွာ ခ်ိတ္ထားၿပီး run လိုက္ရင္ လိုတဲ့ Driver ကို Install လုပ္ေပးပါလိမ့္မယ္။
>> http://mc.tt/b9yBpsQYTI
>> https://www.box.com/s/kdsuz5orxdlw7ytj03be
>> http://www.mediafire.com/download.php?bvvsd5ya5rk0a93

ကဲ…အားလံုးပဲ အဆင္ေၿပၾကပါေစဗ်ာ။ ေနာက္ထပ္ ေတြ႔တာေလးေတြကိုလည္း ဆက္လက္တင္ေပးသြားပါမယ့္။
hanlay

About the Author ()

နာမည္ႀကီးခ်င္လို႔ လုပ္ေနတာ မဟုတ္ဘူး။ ပ်င္းလို႔ လုပ္ေနတာလည္း မဟုတ္ဘူး။ အားလံုးကို ကိုယ္ကိုယ္တိုင္နဲ႔ ကိုယ္ခ်င္းစာေပးေနတာ။ ဘယ္သူမွ အားမေပးခ်င္ေန။ ကိုယ္ယံုၾကည္ရာနဲ႔ပဲ ဆက္ေလွ်ာက္မယ္။

HUAWEI Firmware

24.2.2012 ေန႕အထိထြက္ခဲ့တဲ့ Firmware ေတြကုိတင္ေပးလုိက္ပါတယ္…
C8812 ကေတာ့ Kernal 50 ထြက္လာတာအသစ္ပဲျဖစ္ပါတယ္..
က်န္တာေတြလဲလုိက္ၾကည့္ျပီးလုိအပ္တာေတြေဒါင္းလုိက္ပါ။

C8812,Android 4.0,V100R001C92B950


C8813,Android 4.1,Emotion UI,V100R001C92B167


U8825D,Android 4.0,V100R001C17B956


C8825D,Android 4.0,V100R001C92B947


U8950D,Android 4.0,V100R001C17B956


C8950D,Android 4.0,V100R001C92B948


T8950,Android 4.0,V100R001CHNC01B110


(U8951)G510-0010,Android 4.1,Emotion UI,V100R001C17B173


(G510)T8951,Android 4.0,V100R001CHNC01B206


(U8833)Y300-0000,Android 4.1,Emotion UI,V100R001C17B172


(T8833C)Y300-2010,Android 4.1,Emotion UI,V100R001C92B166


(T8833)Y300,Android 4.0,V100R001CHNC01B206


Y310-5000,Android 2.3,V100R001CHSC01B021


(Y210T)Y210-0010,Android 2.3,V100R001C17B839


(Y210C)Y210-2010,Android 2.3,V100R001C92B824


(Y210S)C8685,Android 2.3,V100R001C92B823

Saturday, September 7, 2013

How to backup Original Stock ROM on Android Phone

A number of time when you plan to root your mobile phone you just ignore the original factory OS. That is the biggest mistake we go. It is very important that you must backup your original ROM. It will help you to restore all the settings/features back to the device if you are not happy with the custom rom installed on your device. There is a common process for almost all devices. You can just backup the rom and restore it back simply how you install a custom rom.
There is no guarantee that whichever custom rom you are trying to install in your android phone will be stable or perfect. There use to bugs many times in many custom roms. The most common bug is battery drain. At that point there is no way to go back. Your warranty is also voided when you root the device. And you cannot carry the phone to service center with that custom rom. So below are some common ways to backup your Original Stock ROM before you do Rooting or Custom Rom installation.

Method 1 : Backup via Nandroid Backup :

Requirements:


  • The most important requirement here is that you will need to root the device. Or else you cannot backup the original rom. The process is extremely simple. When you root the device you gain additional permission on the same. Rooting gives you super user right. Rooting is simply not complicated. You can click on the following guide to read the rooting process: How to Root HTC One X for installing Custom ROMs.
  • Download NANDROID Backup App from Google Play
  • Ensure that your phone is connected to a charger or there must be more than 70% battery left in it.


Steps to backup Original Android ROM through Nandroid:

  • Install NandRoid Backup App in your Device.
  • Ensure that your device is rooted by running Root Checker application
  • Turn off your phone and boot in Recovery Mode. For that press Home + Volume down + Power Key.
  • In the Recovery mode press Alt+B to run the Backup.
  • Method 2: Backup via ClockWorkMod Recovery:

    This process is a bit easier compared to NandRoid.

    Requirements:


  • Download ClockWorkMod Recovery. CWM replaces your existing bootloader and adds more additional options to the device. It offers you a full user permission to perform recovery and restore and works really well.
  • Download ROM Manager Backup App from Google Play
  • Just Ensure that your phone has maximum battery left.


Steps to backup Original Android ROM through CWM :

1. Install ClockWorkMod Recovery on your mobile device. You can simply download that form Google Play

2. When you install it your bootloader is replaced. It offers you full permission to play with the internal ROM. Rooting also void warranty.

3. After installing CWM your device is rooted. We can now move ahead with the backup process.

4. Install ROM Manager Backup Application in your mobile device. You can download it from here.

5. Open the Application. Tap on Flash ClockWorkMode Recovery Option.

6. Tap on Backup Current Rom. Add a file name and then backup the phone.

7. The app will ask you to grant SuperUser Permission. So allow it.

8. Once the Backup is over the phone will restart automatically.

9. With the help of same application you can also restore the existing ROM. You just need to go in Manage and Restore Backup and from there click on Restore.
  •  

လက္ကိုင္ဖုန္းဘက္ထရီအေဟာင္းကို ျပန္သံုးႏိုင္နည္း


ပံုမွန္သံုးလာတဲ့ လက္ကိုင္ဖုန္းဘက္ထရီဟာ တေျဖးေျဖးနဲ ့ အသံုးမခံေတာ့တာေတြ ့ရတတ္ပါတယ္။ အားသြင္းထားေပမယ့္လည္း ခဏေလးနဲ ့ အားကုန္သြားတာဟာ ဘက္ထရီမေကာင္းေတာ့လို ့ျဖစ္ပါတယ္။ အဲ့ဒီဘက္ထရီကို အသံုးခံေအာင္ အားျပည့္လာေအာင္ လုပ္ၾကရေအာင္ပါ။
အသံုးျပဳရမယ့္ပစၥည္းေတြကေတာ့
၁) သတင္းစာစကၠဴအပြစား
၂) ကပ္ေၾကး (လက္နဲ ့ျဖတ္လည္းရပါတယ္)
၃) သားေရကြင္း
၄) ပလပ္စတစ္အိတ္(ဟင္းထုတ္အိတ္အရြယ္)
၅) ေရခဲေသတၱာ

ျပဳလုပ္ပံုအဆင့္ဆင့္
- သတင္းစာစကၠဴအပြစားကို (A4) အရြယ္ရဲ ့ တ၀က္စာေလာက္ အရြယ္ကို ျဖတ္ပါ။ (ဘက္ထရီအၾကီးအေသးေပၚမူတည္ျပီးစကၠဴကိုျဖတ္ပါ)
- လက္ကိုင္ဖုန္းဘက္ထရီအေဟာင္းကို ျဖတ္ထားတဲ့ စကၠဴတစ္ရြက္ နဲ ့ အထပ္ထပ္ထုပ္ပါ။
- သားေရကြင္းနဲ ့စည္းပါ။
- စကၠဴနဲ ့ထုတ္ထားတဲ့ ဘက္ထရီကို ပလပ္စတစ္အိပ္နဲ ့ လိပ္ပတ္ျပီးျပန္ထုပ္ပါ။
- ထုပ္ျပီးသား လက္ကိုင္ဖုန္းဘက္ထရီကို ေရခဲေသတၱထဲက ပံုမွန္အခန္းမွာ ၃ ရက္ထဲ့ထားပါ။
- ေရခဲေသတၱထဲမွာ ၃ရက္ျပည့္ျပီးေနာက္ျပန္ထုတ္ပါ။ ပလပ္စတစ္အိပ္နဲ ့စကၠဴကို ေျဖပါ။
- ပံုမွန္အပူခ်ိန္ရိွတဲ့ မိမိေနအိမ္ရဲ ့တေနရာရာမွ ၃ ရက္ထားပါ။
- ၃ ရက္ ထားျပီးေနာက္ အဲ့ဒီဘက္ထရီကို ၈ နာရီၾကာ အားသြင္းပါ။
အဲ့ဒီလိုအားသြင္းျပီးရင္ေတာ့ အသံုးခံတဲ့ ဘက္ထရီျဖစ္လာပါလိမ့္မယ္။

Saturday, August 10, 2013

ေအာ္ရီဒို ကုမၸဏီမွ အလုပ္ခန္႔ထားမႈ အတြက္ ရွင္းလင္းမႈမ်ား ျပဳလုပ္ သြားမည္

ျပည္တြင္းရဲ႕ ဆက္သြယ္ေရး လုပ္ငန္း လုပ္ကုိင္ခြင့္ တင္ဒါရ ကုမၸဏီတစ္ခုျဖစ္တဲ့ Ooredoo အေနနဲ႔ ယခုၾသဂုတ္လ အတြင္းမွာ အလုပ္ခန္႔ထားမႈ
ေတြအျပင္ လုပ္ငန္းပုိင္း ဆုိင္ရာ အခ်က္အလက္ ေတြကို စာနယ္ဇင္း ရွင္းလင္းပြဲ တစ္ခု ျပဳလုပ္ၿပီး ရွင္းလင္း သြားဖို႔ ရွိတယ္လို႔ သိရပါတယ္။ အဲ့ဒီလို ရွင္းလင္းမႈနဲ႔ အတူ Ooredoo မွ ျပည္တြင္းမွာ ဆက္သြယ္ေရး လုပ္ငန္းမ်ား လုပ္ေဆာင္မယ့္ CEO နဲ႔ မိတ္ဆက္မႈေတြ ကိုလည္း ျပဳလုပ္ သြားမွာ ျဖစ္တယ္လို႔ Ooredoo ရဲ႕ သတင္းျပန္ၾကားေရးမွ တာ၀န္ရွိသူ တစ္ဦးရဲ႕ ေျပာျပခ်က္ အရ သိရပါတယ္။

လက္ရွိ မွာေတာ့ ျပည္တြင္းမွ လုပ္ကုိင္လုိသူေတြ အေနနဲ႔ myanmarcareers@ooredoo.com မွာ ေလွ်ာက္ထားမႈ ေတြကို စတင္ျပဳလုပ္ ႏုိင္ေနၿပီ ျဖစ္တယ္လို႔ သိရပါတယ္။ အဆုိပါ Ooredoo အေနနဲ႔ တင္ဒါရရွိဖုိ႕ တင္ထားစဥ္ အတြင္း ျပည္တြင္းမွာ ဆင္းကတ္ ေတြကို ေငြက်ပ္ ၁၅၀၀ အျပင္ ၎ထက္နည္းတဲ့ ေစ်းႏႈန္း သာမကဘဲ အလကား ေပးႏုိင္ေအာင္ အထိ စီစဥ္ေပး သြားဖုိ႕ သေဘာ တူညီမႈရွိခဲ့ တယ္လို႔ သိရွိရပါတယ္။


Tuesday, July 23, 2013

မိုဘိုင္းအင္တာနက္ message ျဖင့္ ေလွ်ာက္ထားႏိုင္

မိုဘိုင္းအင္တာနက္ message ျဖင့္ ေလွ်ာက္ထားႏိုင္
========================
ၾသဂုတ္လ- ၁ ရက္ေန႔ကစတင္ၿပီး မိုဘိုင္းဖုန္းအင္တာနက္လိုင္းကို မက္ေဆ့ခ်္ ျဖင့္ ေလွ်ာက္ထားႏိုင္သည္ဟု သိရသည္။
ေလွ်ာက္ထားလိုပါက နံပါတ္ - ၁၃၃၁ သို႔ Order data service ဟု မက္ေဆ့ခ်္ ေပးပို႔ရမည္ျဖစ္သည္။
You have ordered data service successfully ! Please restart your handset ဟု မက္ေဆ့ခ်္ ျပန္ဝင္လာပါက မိမိဖုန္းကို restart ခ်ကာ အင္တာနက္အသုံးျပဳႏိုင္ၿပီျဖစ္သည္။ မက္ေဆ့ခ်္ေပးပို႔ရာတြင္ မိမိတို႔ဖုန္းတြင္ ဖုန္းေဘလ္ တစ္ေသာင္းက်ပ္ ရွိရမည္ျဖစ္သည္။ အင္တာနက္ ကနဦးေလွ်ာက္ထားခ တစ္ေသာင္းက်ပ္ကို ၄င္းမက္ေဆ့ခ်္ ေပးပို႔လိုက္သည္ႏွင့္ ဖုန္းေဘလ္ထဲမွ ႏႈတ္ယူသြားမည္ျဖစ္သည္။
ေဖာ္ျပပါ ဝန္ေဆာင္မႈသည္ GSM ႏွင့္ WCDMA ဖုန္းမ်ားအတြက္သာ ျဖစ္ၿပီး က်ပ္ ၁၅၀၀ တန္ဖုန္းမ်ားအတြက္ အသုံးျပဳ၍ မရႏိုင္ေၾကာင္း သတင္းရရွိသည္။

ဘုန္းဘုန္း တို႕ ဖုန္း မကိုင္ရေတာ႔ဘူးလား

Wednesday, July 10, 2013

How to build Mobile Phone Battery Charger Circuit

Description

Mobile phone chargers available in the market are quite expensive. The circuit presented here comes as a low-cost alternative to charge mobile telephones/battery packs with a rating of 7.2 volts, such as Nokia 6110/6150.

Circuit diagram:

Circuit diagram:

Parts

  • R1 = 1K
  • R2 = 47R
  • R3 = 10R
  • R4 = 47R
  • C1 = 1000uF-25V
  • D1 = LEDs any color
  • D2 = LEDs any color
  • D3 = LEDs any color
  • D4 = 1N4007
  • D5 = 1N4007
  • IC1 = LM7806
  • T1 = 9VAC Xformer 250mA
  • BR1 = Diode bridge 1A

Circuit Operation:

The 220-240V AC mains supply is down-converted to 9V AC by transformer T1. The transformer output is rectified by BR1 and the positive DC supply is directly connected to the charger’s output contact, while the negative terminal is connected through current limiting resistor R2. D2 works as a power indicator with R1 serving as the current limiter and D3 indicates the charging status. During the charging period, about 3 volts drop occurs across R2, which turns on D3 through R3.
An external DC supply source (for instance, from a vehicle battery) can also be used to energies the charger, where R4, after polarity protection diode D5, limits the input current to a safe value. The 3-terminal positive voltage regulator LM7806 (IC1) provides a constant voltage output of 7.8V DC since D1 connected between the common terminal (pin 2) and ground rail of IC1 raises the output voltage to 7.8V DC. D1 also serves as a power indicator for the external DC supply. After constructing the circuit on a veroboard, enclose it in a suitable cabinet. A small heat sink is recommended for IC1.


Description

Charging of the mobile phone, cellphone battery is a big problem while traveling as power supply source is not generally accessible. If you keep your cellphone switched on continuously, its battery will go flat within five to six hours, making the cellphone useless.
A fully charged battery becomes necessary especially when your distance from the nearest relay station increases. Here’s a simple charger that replenishes the cellphone battery within two to three hours. Basically, the charger is a current-limited voltage source. Generally, cellphone battery packs require 3.6-6V DC and 180-200mA current for charging. These usually contain three NiCd cells, each having 1.2V rating.
Current of 100mA is sufficient for charging the cellphone battery at a slow rate. A 12V battery containing eight pen cells gives sufficient current (1.8A) to charge the battery connected across the output terminals. The circuit also monitors the voltage level of the battery. It automatically cuts off the charging process when its output terminal voltage increases above the predetermined voltage level.

Circuit diagram:

Circuit diagram

Parts:

  • P1 = 20K
  • P2 = 20K
  • R1 = 390R
  • R2 = 680R
  • R3 = 39R-1W
  • R4 = 27K
  • R5 = 47K
  • R6 = 3.3K
  • R7 = 100R-1W
  • C1 = 4.7uF-25V
  • C2 = 0.01uF
  • C3 = 0.001uF
  • D1 = 5.6V-1W Zener
  • D2 = 3mm. Red LED
  • Q1 = SL100
  • S1 = On/Off Switch
  • B1 = 1.5vx8 AA Cells in Series
  • IC1 = NE555 Timer IC

Circuit Operation:

Timer IC NE555 is used to charge and monitor the voltage level in the battery. Control voltage pin 5 of IC1 is provided with a reference voltage of 5.6V by zener diode D1. Threshold pin 6 is supplied with a voltage set by P1 and trigger pin 2 is supplied with a voltage set by P2. When the discharged cellphone battery is connected to the circuit, the voltage given to trigger pin 2 of IC1 is below 1/3Vcc and hence the flip-flop in the IC is switched on to take output pin 3 high. When the battery is fully charged, the output terminal voltage increases the voltage at pin 2 of IC1 above the trigger point threshold.
This switches off the flip-flop and the output goes low to terminate the charging process. Threshold pin 6 of IC1 is referenced at 2/3Vcc set by P1. Transistor Q1 is used to enhance the charging current. Value of R3 is critical in providing the required current for charging. With the given value of 39-ohm the charging current is around 180 mA. The circuit can be constructed on a small general-purpose PCB.
For calibration of cut-off voltage level, use a variable DC power source. Connect the output terminals of the circuit to the variable power supply set at 7V. Adjust P1 in the middle position and slowly adjust P2 until LED (D2) goes off, indicating low output. LED should turn on when the voltage of the variable power supply reduces below 5V. Enclose the circuit in a small plastic case and use suitable connector for connecting to the cellphone battery.

စကားတန္ဖိုး အဟစ္ဟစ္

Thursday, June 20, 2013

KM mobile ေငြျဖည္႕ကတ္ ျဖန္႕ခ်ိေရး

KM mobile မွ ေငြျဖည္႕ကတ္မ်ား ကို လႈိုင္သာယာ ျမိဳ႕နယ္ႏွင္႕ အင္းစိန္ ျမိဳ႕နယ္ အတြင္း  ဆိုင္ အေရာက္ လက္လီလက္ကား ျဖန္႕ခ်ိေပးေနသည္။ ဆက္သြယ္ရန္ ဖုန္းမ်ား 09448001235  09420305066

LEGO® STAR WARS™ -APK+OBB-(134Mb)

LEGO® STAR WARS™ -APK+OBB-(134Mb)
===========================
ဒီဂိမ္းေလးကေတာ့စၾကာဝဌာ ထဲမွာတုိက္ခုိက္ရတဲ့ဂိမ္းေလးပါ။မိမိစိတ္ႀကိဳက္character ကုိဖန္တီးႏူိင္ၿပီး စိတ္ႀကိဳက္ယ်ာဥ္ပ်ံမ်ားကုိလည္း ဖန္တီးႏူိင္ၿပီး ရန္သူေတြနဲ႔ျပန္လည္တုိက္ခုိက္ရမွာပါ။မိမိစိတ္ႀကိဳက္စစ္တပ္ကုိတည္ေထာင္ႏူိင္ၿပီးေတာ့စြမ္းအားျမင့္ယ်ာဥ္ပ်ံမ်ားကုိလည္းဖန္တီးႏူိင္ပါေသးတယ္။

ရုပ္ထြက္ပုိင္းလည္းေကာင္းမြန္သလုိကစားရတာလည္းစိတ္ဝင္စားဖုိ႔ေကာင္းပါတယ္။ကဲခ်စ္စရာေကာင္းတဲ့ကာတြန္းဇက္ေကာင္ေလးေတြေနရာကေန

ဝင္ေရာက္ကစားၿပီးေတာ့ရန္သူေတြလက္ထဲကေနၿပီးစၾကာဝဌာႀကီးကုိျပန္လည္ကယ္တင္ရေအာင္။ဒီဂိမ္းေလးကုိကစားဖုိ႔မိမိဖုန္းဟာ Android Version 4.0+ႏွင့္အထက္ရွိရပါမယ္။ဒီဂိမ္းေလးကုိGoogle Play store တြင္Freedownload ရယူႏူိင္ၿပီးေတာ့ Myanmar Mobile App Store တြင္လည္းေဒါင္းေလာ့ရယူႏူိင္ပါသည္။ေအာက္ကလင့္ခ္တြင္ရယူပါ။
http://www.myanmarmobileapp.com/2013/06/20/lego-star-wars-apkobb-134mb/

iPhone မွ Android phone သုိ႕ Contacts မ်ားကုိ Copy/Move ျပဳလုပ္ျခင္း


Ios မွာ android device မ်ားသုိ႕ Contacts မ်ား ကူးေျပာင္းႏုိင္မယ့္ နည္းေလးကုိ ေအာက္ပါ အတုိင္းျပဳလုပ္နုိင္ပါတယ္ ..
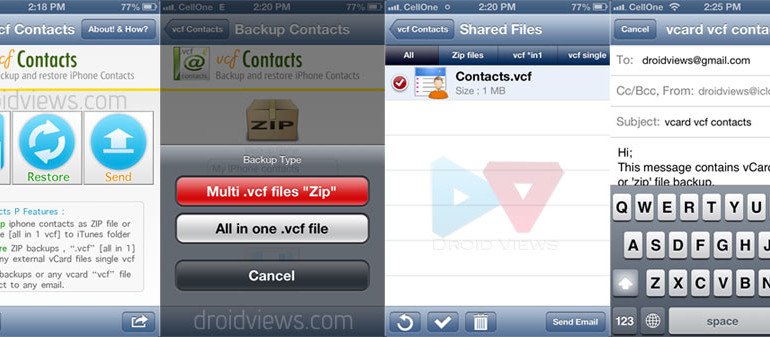
(1)  ပထမဆုံး iphone ေပၚမွ App Store ကုိ ဖြင့္ျပီး free app ျဖစ္တဲ့ “vcf Contacts”  download  ဆြဲပါ..
(2) download ဆြဲျပီးပါက မိမိရဲ႕ ios device ထဲတြင္ install ျပဳလုပ္ျပီး ဖြင့္လုိက္ပါ..ျပီးရင္ Back up icon ကုိ ႏွိပ္ပါ..
(3)  “All in One .vcf File” back up type  ကုိ ေရြးေပးပါ ..
(4)  Contacts မ်ားကုိ sigle file အျဖစ္ back up ျပဳလုပ္ေနပါလိမ့္မယ္ ..
(5)   ျပီးရင္ “Contacts.vcf”  ဖုိင္ေရြးျပီး bottom bar ေပၚမွ  “Send Email” icon ႏွိပ္လုိက္ပါ ..
(6)  Next screen ေပၚမွ address field မွာ Gmail လိပ္စာ ရုိက္ျပီး  Send ကုိ ေရြးေပးလုိက္ပါ ..
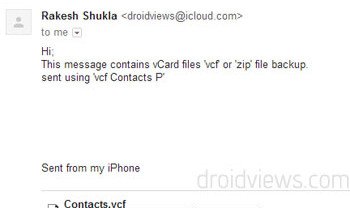
(7) ေပးထားတဲ့ Gmailလိပ္စာ  ထဲကုိ ေရာက္သြားပါမယ္ . အဲဒီအခါမွာ android phone ကုိ အသုံးျပဳျပီး မိမိရဲ႕ ေမးလ္လိပ္စာနဲ႕ ၀င္လုိက္ပါ ..new mail အေနနဲ႕ ေရာက္ေနပါလိမ့္မယ္ ..
import to contacts or download မိမိၾကဳိက္ႏွစ္သက္သလုိ လုပ္ယူႏုိင္ပါတယ္ ..
အားလုံး အဆင္ေျပၾကပါေစ..
မ်ဳိးမင္းသန္႕

အစုိးရအေနျဖင့္ မုိဘုိင္းေစ်းႏႈန္းကုိ စီးပြားေရးသမားမ်ားမလာခင္ တမင္ေလွ်ာ့ခ်လုိက္ျခင္းျဖစ္သည္ဟုဆုိ

ကုမၸဏီၾကီးမ်ား၀င္ေရာက္လာခ်ိန္တြင္ ျမန္မာ့ဆက္သြယ္ေရးလုပ္ငန္း(MPT) ကလည္းေႏွးေန၍မျဖစ္ဟုဆုိ

Saturday, June 15, 2013

Huawei C8813/C8813D,G520-0000,Y300-0000,Y300C,G510-0010 အကုန္ ROOT လုပ္မယ္

စမ္းခ်င္ရင္လဲစမ္းက်ေပါ့ဗ်ာ က်ေနာ့္မွာေတာ့စမ္းစရာကုန္ပီရွိသမွ် ပဲ…..
အရင္ ROOT အဆင္မေျပတဲ့ ဖုန္းေတြပါ..မလြယ္တဲ့ဖုန္းေတြပါ C8813 တို႔ G510 တို႔ကေတာ့ Code ေတာင္းပီးလုပ္လဲရပါတယ္..ဒါေပမဲ့ၾကာတာေပါ့ေနာ္…ခုနည္းကေတာ့ ျမန္တယ္မွန္တယ္….dload နဲ႔လုိ႔ေတာ့မထင္နဲ႔ေနာ္အဲေကာင္က [dload] က error အျပည့္နဲ႕ဗ်…[ သူမ်ားေျပာတာျပန္ရြီးးးတာ ]…အခုဟာက TOol ေလးတခုေပါ့….နာမည္လဲႀကီးတယ္သိလဲသိၾကၿပီးသားးးပါ…..အရင္ version ေတြကေတာ့အဆင္မေျပေလာက္ဘူးးးးအခု version အသစ္ကေတာ့ေတာ္ေတာ္အိုေကတယ္….. VROOT ဆိုတဲ့ TOOl ေလးပါ…. version က 1.4 ပါ…အရင္ေဒါင္းသြင္းထားလိုက္ေနာ္….
VROOT 1.4 ေဒါင္းရန္……
ၿပီးရင္…ဖုန္းကိုကြန္ျပဴတာနဲ႔ခ်ိတ္…Device သိေနၿပီဆိုရင္ VRoot က ခလုတ္ေလးႏွိပ္ေပးလိုက္ပါ တ႐ုတ္စာနဲ႔ဆိုေတာ့ ဘာေရးထားလဲေတာ့တိ၀ူးးး ROOT လို႔ေရးထားတာထင္တာပဲ

အာ့ေလးႏွိပ္လိုက္ေနာ္…ဖုန္းက Recovery ထဲေရာက္သြားလိမ့္မယ္….ခနေစာင့္ပါေစာင့္ႏိုင္ရင္ေစာင္ ပါ Reboot ျဖစ္ပါမယ္..မေစာင့္ႏိုင္လဲ Reboot system now ေလးႏွိပ္ေပးလိုက္ပါ… VRoot
မွာအမွန္ေလးေပၚသြားၿပီးဖုန္းျပန္တက္လာရင္ Superuser ရေနပါၿပီ…
unroot ပါတခါထဲေျပာျပပါမယ္… ကြန္နဲ႔ခ်ိတ္ပါ….MTP Mode နဲ႔ထားးးပါ…. unlock root ဖြင့္ၿပီး unroot ခလုတ္ေလးႏွိပ္ေပးပါ Reboot ေပးခိုင္းၿပီးျပန္တက္လာရင္ unroot ျဖစ္ပါၿပီ…..
အဆင္ေျပၾကပါေစက်ေနာ္စမ္းထားသေလာက္ဘာ error မွ မတက္လာပါဘူးးး…
source: http://www.myanmarmobileapp.com/2013/06/14/c8813c8813dg520-0000y300-0000y300cg510-0010-%E1%80%A1%E1%80%80%E1%80%AF%E1%80%94%E1%80%B9-root-%E1%80%99%E1%80%9A%E1%80%B9/.

မိုဘုိင္းဖုန္းမွတစ္ဆင့္ BBC သတင္းမ်ားကုိျမန္မာဘာသာျဖင့္နားဆင္နုိင္ျပီ

Sunday, June 2, 2013

Huawei Y210C Root , MM Font, KB, Wifi Fix လုပ္ေပးမည့္ Tool


(ဖုန္းကို အရင္ဆံုး fastboot mod မွာ၀င္ထားရပါမည္။)
1. ကိုေရြးရင္ေတာ့ ဖုန္းကို Root လုပ္ ျမန္မာေဖာင့္ႏွင့္ ကီးဘုတ္ထည္႕ေပးမွာပါ။
2. ကိုေရြးရင္ေတာ့ ဖုန္းကို Root မလုပ္ပဲ ျမန္မာေဖာင့္ႏွင့့္ ကီးဘုတ္ထည္႕ေပးမွာပါ။
3. ကေတာ့ အေပၚက ၁ ႏွင့္ ၂ လုပ္လိုက္လို႕ wifi error ျဖစ္ခဲ့ရင္ ျပင္ဆင္ဖို႕ပါ။
ၾကိဳက္သလို  Share နိုင္ပါတယ္   
>>>>>>> DOWNLOAD HERE <<<<<<<<<<
Credit to  သင္ဆရာ ၿမင္ဆရာမ်ားး
KO MYO & HTAY HLAING OO

Wednesday, May 29, 2013

တန္ဖိုးနည္းဖုန္း အဟစ္ဟစ္

Huawei C8813 ႏွင့္ 1500 တန္ Sim Card


Huawei C8813 ႏွင့္ 1500 တန္ Sim Card ျပသနာေလး ေျဖရွင္းနည္းေဖာ္ျပေပးလိုက္ပါတယ္။

Credit to Ko Naing

Huawei C8813 ႏွင့္ 1500 တန္ Sim Card
Huawei C8813 ဟန္းဆက္မ်ားတြင္ 1500 တန္ Sim Card မ်ား ထည့္ေသာအခါ လိုင္းမတက္ ... ကုဒ္မေတာင္းပါက ... 910 (သို ့မဟုတ္) 73 ျဖင့္ စေသာ CDMA800 လိုင္းကဒ္ကိုထည့္လိုက္ပါ ... 910 (သို ့မဟုတ္)73 ကဒ္မ်ားထည့္ၿပီး ကုဒ္မေတာင္းေသးလွ်င္ Setting ထဲမွ Factory data reset တစ္ၾကိမ္ခ်လိုက္ပါ ... ေသခ်ာေပါက္ ကုဒ္ေတာင္းပါလိမ့္မည္ .... ကုဒ္ေတာင္းလွ်င္ Phone ပါကင္ဗူးအတြင္း ပါရွိေသာ .. ကုဒ္ စာရြက္ ကိုၾကည့္ၿပီး.. ကုဒ္ကို ေသခ်ာစြာ ရိုက္ထည့္ေပးလိုက္ပါ .. .ကုဒ္မွန္လွ်င္ Network Unlock Successfully ဆိုၿပီး ျပပါလိမ့္မည္ ...
ၿပီးလွ်င္

Setting>>International Roaming >> Network Selection Setting >> အေပၚက လိုင္းကဒ္ေပၚတြင္ CDMA Only ကိုေရြးေပးပါ >> ေအာက္က Select CDMA Network >> Switch To Next Network ကိုေရြးေပးၿပီး ေခတၱေစာင့္ဆိုင္းလွ်င္ လိုင္းရရွိပါလိမ့္မည္ ...
ေၿဖၾကားေပးေသာ .... KO Myo (ပုသိမ္) & Skipper Bobo (ကြ်န္ေတာ့္ဆရာ) တို ့အား အထူးပင္ ေက်းဇူးတင္ရွိပါသည္ ...


Libra Mobile Phone Service မွ ပို႔စ္အားျပန္လည္မွ်ေ၀ျခင္းျဖစ္ပါသည္။
Credit to:  Libra Mobile Phone Service

Folder Organizer v3.6.6 APK ( 2.85MB)


Android OS ဖုန္းသံုးစြဲသူေတြအတြက္ မိမိႏွစ္သက္ရာ apk ေတြကို

တစ္စုတစ္စည္းထဲ တူရာေလးေတြစုၿပီး မိမိစိတ္ႀကိဳက္နာမည္ေလးေတြေပးၿပီး

သိမ္းထားလို႔ရတယ္……ဖုန္းရဲ႕ Home Screen မွာလည္း Widget အေန

မိမိစိတ္ႀကိဳက္ Label တပ္ၿပီးထားလို႔လည္းရတဲ႔ apk အလန္းေလးပါ….

Icon ေလးေတြကိုလည္း Notification Bar မွာလည္းထားလို႔ရပါတယ္…….

Folder Organizer apk ေလးရဲ႕

Feature ေတြကိုေအာက္မွာဖတ္ၾကည္႔ႏိုင္ပါတယ္….

Sort folder items any way you like
Make app shortcuts with custom icons and names
IconFinder support: search for new icons on the web
Put items in notification bar
Scrollable widgets


Require ; Android 2.1 and up


Folder Organizer v 3.6.6 ( Latest Version ) ေလးကို ဒီမွာယူပါ……..


http://www.myanmarmobilesoftwaredeveloper.com/?p=7148

Android ဖုန္းတြင္ အသံုးျပဳေသာ လွ်ိဳ ႔ဝွက္ကုဒ္မ်ား

Android ဖုန္းတြင္ အသံုးျပဳေသာ လွ်ိဳ ႔ဝွက္ကုဒ္မ်ား

Android OS အသံုးျပဳတဲ့ မိုဘိုင္းဖုန္းမ်ားအတြက္ လွ်ိဳ ႔ဝွက္ကုဒ္မ်ား ျဖစ္ပါ တယ္။

1. Testsလုပ္ရန္ ကုဒ္မ်ား

*#*#0588#*#* – Proximity sensor test

*#*#2664#*#* – Touch screen test

*#*#2663#*#* – Touch screen version

*#*#0*#*#* – LCD test

*#*#0673#*#* သို႔မဟုတ္ *#*#0289#*#* – Melody test

*#*#0842#*#* – Device test (Vibration test and BackLight test)

*#*#3264#*#* – RAM version

*#*#0283#*#* – Packet Loopback

*#*#232331#*#* - Bluetooth test

*#*#232337#*# - Bluetooth device address ကုိျပျခင္း

*#*#232338#*#* –WiFi MAC address ကိုျပန္ခ်င္း

*#*#1472365#*#* - GPS test

*#*#1575#*#* - အျခား GPS test

2. Obtaining Firmware information

*#*#1234#*#* – PDA and Phone

*#*#1111#*#* – FTA SW Version

*#*#2222#*#* – FTA HW Version

*#*#44336#*#* – PDA, Phone, CSC, Build Time, Changelist number

*#*#4986*2650468#*#* – PDA, Phone, H/W, RFCallDate

3. Backup လုပ္ရန္ ကုဒ္မ်ား

*#*#273283*255*663282*#*#* - ဖိုင္လ္မ်ားကုိ Backup လုပ္ရန္ Menu တစ္ခုေပၚလာမည္။

4. Service mode

*#*#197328640#*#* - you can change settings or run tests in service mode

5. End Call / Power button ေျပာင္းလဲျခင္း

*#*#7594#*#*

6. Reset လုပ္ျခင္း

*2767*3855# – Factroy setting သို႔ ျပန္လည္ Rest လုပ္ေပးသည္။ ထို႔ေၾကာင့္ ယင္းကုဒ္ကို အသံုးျပဳလွ်င္ file မ်ား၊ setting မ်ား ျပတ္ကုန္ပါမည္။
used to reset your phone to factory settings. Be careful with it though, this option will remove files, setting etc

*#*#7780#*#* - Factory Data reset လုပ္ျခင္း ျဖစ္သည့္အတြက္ ဖုန္းထဲတြင္ သိမ္းဆည္းထားေသာ Google Account setting မ်ား၊ Downloa လုပ္ထားေသာ Application မ်ား၊ system ႏွင့္ application data ႏွင့္ Setting မ်ားကို ဖ်က္ဆီးလိုက္သည္။

7. ဖုန္း၏ information ၾကည့္ရွုရန္

*#*#4636#*#*- battery information, battery history, phone information, usage statistics

သစ္ကပ္ပန္း

Thursday, May 16, 2013

တရုတ္တက္ဘလက္ေတာ္ေတာ္မ်ားမ်ားကို Firmware ျပန္တင္နည္း


အစရွာမရတဲ့ တရုတ္တက္ဘလက္ေတာ္ေတာ္မ်ားမ်ားကို Firmware ျပန္တင္နည္းနည္းနည္းေလးေနာက္က်သြားတယ္ဗ်ာ :P ဟီး (၂) ရက္ေလာက္ေပါ့ ေသခ်ာေအာင္စမ္းေနလို႕ပါ ... ။
အခုပထမဦးဆံုးလိုအပ္တဲ့ဖိုင္ေလးေတြကိုအရင္ေဒါင္းထားပါဗ်ာ ... ။
ၿပီးရင္ SD card (၁) ကဒ္ေလာက္ေတာ့လိုမယ္ဗ် ... Class ေကာင္းေကာင္း ကဒ္အသန္႕ေလးဆုိပိုေကာင္းတယ္ ... ။။ :P
မိတ္ေဆြတို႕ရဲ႕ Tablet ကို အားအျပည့္သြင္းထားလိုက္ပါ ... ဘယ္ ေလာက္သြင္းရင္ အားျပည့္မလဲဆိုတာေတာ့ ကိုယ့္ဘာသာကိုယ္ သိမွာေပါ့ေနာ္ ... ။
** SD card ကို FAT (32) format နဲ႕ Format ရိုက္ထားပါ ... ။
** ေဒါင္းၿပီးလို႕ရလာတဲ့ ဇစ္ဖိုင္ေလးကို မိတ္ေဆြတို႕ရဲ႕ SD ထဲကို Rar ျဖည္ခ်လိုက္ပါ ... ။
** ၿပီးရင္ အဲ့ဒီျဖည္ခ်တဲ့ ထဲမွာ Changer.bat ဆိုတာေလးကို RUN လိုက္ပါ ... Tablet Model name ေတြအမ်ားႀကီးေပၚလာပါလိမ့္မယ္ ... ။
** ေပၚလာတဲ့ Model ထဲက မိမိတို႕ Tablet နံပါတ္ေလးကို ရုိက္လုိက္ပါ ...
** Enter ေခါက္ၿပီးသြားရင္ SD card ကို Format ခ်မွာလား တခါေမးပါမယ္ ...( N ) လို႕ရုိက္ေပးပါ ... ။
** ေနာက္တခါ SD card ထဲကို Copy လုပ္မွာလားလို႕ ေမးပါမယ္ ... (N) ထပ္ရိုက္ေပးပါ ... ။။
** SD card ကို ကြန္ပ်ဴတာကေန Safely Remove လုပ္ၿပီး ထုတ္လိုက္ပါ ... ။
** ၿပီးရင္ မိတ္ေဆြတုိ႕ Tablet အားျပည့္ေလာက္တဲ့အခါ SD ကိုထည့္ၿပီး Power On ေပးပါ ... ။
** သူ႕ဘာသာ အလုပ္ဆက္လုပ္သြားပါလိမ့္မယ္ ... ။
** Upgarde step ေတြဆက္လုပ္သြားပါလိမ့္မယ္ ... ။
** ကိုယ္ေရြးတဲ့ Option No. မွားရင္ေတာ့ Error ေတြျပပါလိမ့္မယ္ ... ။
ဥပမာ .... Cannot upgrade Kernel (Nand) တုိ႕ ေနာက္ၿပီး Fail to mounted android data partition တုိ႕ျပရင္ ကိုယ့္ေမာ္ဒယ္နံပါတ္ကုိ ေသခ်ာေရြးေပးပါ ... ။
တကယ္လို႕ Model မွန္တယ္ မရဘူးဆိုရင္ နံပါတ္ (၂) Download ကို ဆဲြပါ ... ၿပီးရင္ Firmware install ဆိုတဲ့ Folder ထဲက Uzimage.bin ဆိုတဲ့ဟာနဲ႕ Replace လုပ္ပါ ... ။
ေနာက္တစ္ေခါက္ ထပ္ၿပီး Upgarde လုပ္ၾကည့္ပါ ... ။ မရေသးဘူး Error ျပေနေသးတယ္ဆုိရင္ နံပါတ္ (၃) download ကိုဆဲြပါ ... ။ ခုနကလိုပဲ Replace လုပ္ပါ ... ။ ထပ္လုပ္ၾကည့္ပါ
ရပါလိမ့္မယ္ .... ။
အားလံုးၿပီးသြားရင္ Please Remove SD ဆိုၿပီးေပၚလာပါလိမ့္မယ္ ... ေပၚလာရင္ SD ကိုျဖဳတ္ေပးလိုက္ပါ ... Reboot က်ၿပီး ျပန္တက္ပါလိမ့္မယ္ ... စိတ္ရွည္ပါ ... (၅) မိနစ္ကေန မိနစ္ (၂၀) ထိၾကာႏိုင္ပါတယ္ ... ။ ျပန္တက္လာရင္ Factory Reset တစ္ေခါက္ေလာက္ခ်ေပးပါ .... ။
ဒါဆိုရင္ အားလံုး အိုေကပါၿပီ ... ။
Tablet Name မသိတဲ့သူေတြအတြက္ကေတာ့ 7'' Tablet အမ်ားစုက Option 1,8,30,7  စတာေတြနဲ႕အဆင္ေျပတတ္ပါတယ္ ... ။
မိမိတို႕ Tablet က Charging သြင္းရင္ Led က ဘာအေရာင္ ပါ၀ါတက္ရင္ ဘာအေရာင္ ဆုိတာေလးေတြနဲ႕ ကိုက္ၿပီး Option ေလးေတြကိုေရြးေပးပါ ... ။
အဆင္ေျပပါလိမ့္မယ္ ... ။
ဒီနည္းလမ္းဟာ WM8650 based Tablet ေတြအတြက္ျဖစ္ပါတယ္ ... ။ ေနာက္ထပ္ ထပ္ၿပီး စမ္းသပ္ၿပီးတင္ေပးပါဦးမယ္ ... :D :D :D
Download (3) >> http://www.mediafire.com/?gqal02dy1mqaa1d (Uzimage)
ဆရာႀကီးေတြလိုေရးလိုက္ဦးမယ္ ဟီဟိ I won't responsible & Use at your own risk.
Credit To : Google, Technow, HCH
စိုင္းအာကာ (MMUC)
ဒီေကာင္ေလးနဲ႕ Firmware ျပန္တင္ၿပီးတဲ့အခါ Touch မရေတာ့တာေတြ ေၾကာင္ေနတာေတြျဖစ္တတ္ပါတယ္ ... အဲ့ဒီအခါ USB Mouse ေလးနဲ႕ Factory Data reset တခါခ် ၿပီးရင္ Touchpal calibration ကို ျပန္ခ်ိန္ေပးလိုက္ပါ ... ရသြားပါလိမ့္မယ္ ... ။
https://www.facebook.com/groups/MyanmarMobileUsers/doc/525410480816657/By စိုင္း အာ ကာ in Myanmar Mobile Users Club