SlowFirefox-Itis. n. The thing that happens to Firefox over time. Symptoms include decline in speed and efficiency.
So, you’ve turned on your computer, clicked on Mozilla Firefox, and then….you waited. “Why,” you say, “Is firefox slower now?”
Well, we’re here to fix that problem! Whether it’s just because you want to make Firefox faster than it already is (which is wickedly fast anyway), or because you want to fix your declining speed, you’ve come to the right place.
Please note that if you do not have firefox as your default browser, I advise you to get it immediately. It is faster and more efficient than every browser out there. It is obtainable at mozilla.org/firefox.
If you use all the methods put together, you should be able to see a speed increase of at least 50% on Firefox.
Method 1:
Okay, well. To begin with, I will tell you how to increase your bandwidth speed by 20%.
Windows actually reserves 20% of your bandwidth for purposes I will never know. I’ll show you in a few easy steps, how to reclaim it.
Step 1:
Click “Start“, and go on “Run“, and type in “gpedit.msc“. You should see this:
Step 2: You should see a thing called ‘Group Policy’ open.
Step 3: Double-Click on “Computer Configuration”.
Step 4: Double-Click on “Administrative Templates”
Step 5: Double-Click on “Network”
Step 6: Double-Click on “QOS Packet Scheduler”
Step 7: Double-Click on “Limit Reservable Bandwidth”
Step 8: Check the box that says ‘Enabled’ and change Bandwidth Limit (%) to 0.
You got 20% increase on your bandwidth speed! Easy, was it not?
Method 2:
The next way is to modify the amount of requests can accept at once. By changing it to a very high number (30+), you should see a massive rise in speed.
So, to this, I’ll put it in a few easy to follow steps.
Step 3: Next, scroll down look for the line that says network.http.pipelining, and double-click this. This will set this to “True”.
Step 4: Now, scroll down and look for network.http.pipelining.maxrequests. Once you have done this, double-click it, and a box will pop up. Change the number to 60.
Close Firefox. You will now experience a 10% to 40% increase in speed.
Method 3:
Finally, the last way to increase your speed, is by using an add-on for Firefox, called FasterFox. It’s increased my speed greatly. Although, my friend, who owns a weak computer, said it doesn’t work well for him, so if your computer is weak, you may want to stop here.
FasterFox basically increases your speed by recycling all the idle bandwidth not doing anything, and makes it load your pages faster.
You can get FasterFox at http://fasterfox.mozdev.org/.
Install it, and your done! Hopefully, you now have a faster running Firefox! Any other ideas, post a comment!
This is a guest post by Anthony Duong, a tech enthusiant.
So, you’ve turned on your computer, clicked on Mozilla Firefox, and then….you waited. “Why,” you say, “Is firefox slower now?”
Well, we’re here to fix that problem! Whether it’s just because you want to make Firefox faster than it already is (which is wickedly fast anyway), or because you want to fix your declining speed, you’ve come to the right place.
Please note that if you do not have firefox as your default browser, I advise you to get it immediately. It is faster and more efficient than every browser out there. It is obtainable at mozilla.org/firefox.
If you use all the methods put together, you should be able to see a speed increase of at least 50% on Firefox.
Method 1:
Okay, well. To begin with, I will tell you how to increase your bandwidth speed by 20%.
Windows actually reserves 20% of your bandwidth for purposes I will never know. I’ll show you in a few easy steps, how to reclaim it.
Step 1:
Click “Start“, and go on “Run“, and type in “gpedit.msc“. You should see this:
Step 2: You should see a thing called ‘Group Policy’ open.
Step 3: Double-Click on “Computer Configuration”.
Step 4: Double-Click on “Administrative Templates”
Step 5: Double-Click on “Network”
Step 6: Double-Click on “QOS Packet Scheduler”
Step 7: Double-Click on “Limit Reservable Bandwidth”
Step 8: Check the box that says ‘Enabled’ and change Bandwidth Limit (%) to 0.
You got 20% increase on your bandwidth speed! Easy, was it not?
Method 2:
The next way is to modify the amount of requests can accept at once. By changing it to a very high number (30+), you should see a massive rise in speed.
So, to this, I’ll put it in a few easy to follow steps.
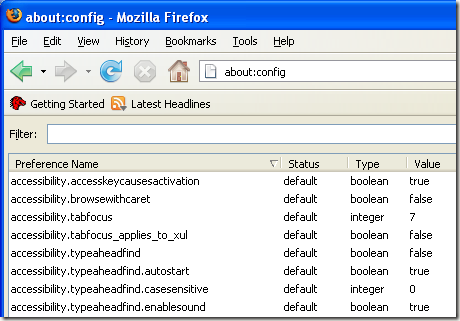
Step 1: Load up Mozilla Firefox. Now, in the address bar, type “about:config” (Without the ” ” of course). You should see this:
Step 2: Scroll down the page until you find browser.tabs.showSingleWindowModePrefs, and then double-click it. This will set it to “True”.Step 3: Next, scroll down look for the line that says network.http.pipelining, and double-click this. This will set this to “True”.
Step 4: Now, scroll down and look for network.http.pipelining.maxrequests. Once you have done this, double-click it, and a box will pop up. Change the number to 60.
Close Firefox. You will now experience a 10% to 40% increase in speed.
Method 3:
Finally, the last way to increase your speed, is by using an add-on for Firefox, called FasterFox. It’s increased my speed greatly. Although, my friend, who owns a weak computer, said it doesn’t work well for him, so if your computer is weak, you may want to stop here.
FasterFox basically increases your speed by recycling all the idle bandwidth not doing anything, and makes it load your pages faster.
You can get FasterFox at http://fasterfox.mozdev.org/.
Install it, and your done! Hopefully, you now have a faster running Firefox! Any other ideas, post a comment!
This is a guest post by Anthony Duong, a tech enthusiant.


No comments:
Post a Comment